iOS Today 675, Transcript
Please be advised this transcript is AI-generated and may not be word for word. Time codes refer to the approximate times in the ad-supported version of the show.
0:00:00 - Mikah Sargent
Coming up on iOS. Today you've got iPhone cameras right. I mean, that's why you're watching the show and look, they're kind of complicated. So Rosemary Orchard and I are going to help you out with those cameras. Stay tuned.
0:00:14 -
Podcasts you love from people you trust.
0:00:24 - Mikah Sargent
This is iOS today, with Rosemary Orchard and Micah Sargent, episode 675, recorded Tuesday, october 17th 2023. Iphone camera tips and tricks. This episode of iOS today is brought to you by Milio. Milio Photos is a smart and powerful system that lets you easily organize, edit and manage years of important documents, photos and videos in an offline library hosted on any device, and it's free. See what has us so excited by visiting miliocom slash twit. Welcome back to iOS today, the show where we talk all things iOS, ipados, watchos, tvos, homepodos and all of the other operating systems that you can run on your Apple devices. This is the show where we talk about those operating systems. We talk about the settings for those operating systems. We talk about great apps you can use on those devices. We talk about all sorts of stuff. I am one of your hosts, micah Sargent.
0:01:25 - Rosemary Orchard
And I am Rosemary Orchard and very happy to be here today talking about cameras. Micah is getting into that time of year where everyone wants to take pictures and it's just so much fun when you can really take great pictures.
0:01:37 - Mikah Sargent
Yes, it's the most wonderful time of the year. I don't want to sing too much of that. It might get I don't know content, content scanned anyway. No, it was nowhere near what that actually sounds like. You should go listen to that song.
But, yeah, there are a lot of people who, leading into these holiday months, begin to capture photos of friends and family I think about. Here in the United States and elsewhere. Halloween is coming to be in full swing, so you may want to capture photos of costumes, for example, and, frankly, there are new iPhones in people's hands and on those new iPhones there are new camera features. So we thought it would be the perfect time to kind of go through what your camera can do and help you with getting everything set up as you like it, and I have to say, it is a relatively complicated set of settings, frankly, and features that the camera has, as more has been added over time, and in the latest models of iPhone iPhone 15, there are, I believe, seven different camera lenses. There are really sort of profiles for the camera that are changed based on what camera lens. And I'm saying this in scare quotes for people who are listening and not watching, because it's not actually changing out. Well, within a certain region, it's not actually changing out the lens on your camera. It may switch to a different lens, but it is a sort of digital representation of what it would be like to use a 35mm lens, say. So, yeah, I think we should dig in and get started, and I think the best place to get started is by hopping into the Settings app, because if we go into the Settings app, then we can scroll down and we can choose camera and, frankly, this is one of the things that I like to do. Anytime I get a new app on my phone or my Mac, the first place I go is to the System Settings, because you often end up learning a lot about the capabilities of the app or the feature based on the settings that you can set. You may go oh, I didn't realize I could do that. So we hop into camera and we see a whole host of options we've got and I'm going to read these out and I will briefly talk about them Record video, record slow-mo, record cinematic.
To start, and this is saying when I record video, these are the settings I want. When I record slow motion footage, these are the settings that I want when I record cinematic. These are the settings that I want. Cinematic is the form where you can take shots of a video scene and in post you can change the focus of the shot to do a sort of rack focus. Look, it was a feature that was introduced in a previous iPhone model with the hope that people would kind of take advantage of the computational bokeh and the ability of multiple camera lenses to capture multiple focal lengths.
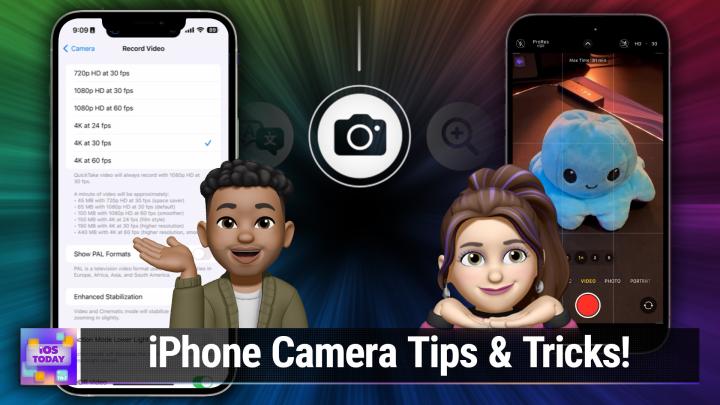
So let's head into record video and immediately we are presented with a lot of options Up at the top. Are our frame rates right? What? How are we capturing footage? Are we capturing it at 24 frames per second? At 30 frames per second? And then at what size?
I personally have mindset at 4K, 30 frames per second, and what I love is that Apple makes it very clear that kind of going from the top of this list to the bottom of this list, the footage is higher resolution and in the case of well, actually in every case it gets smoother as it goes down, but it's of course, going to take up a lot more storage on your device. So I have mindset at 4K 30 and I think this is great for capturing kind of personal video, but anytime I'm shooting video that is that I might want to use in sort of a film project, I do switch that to 24 frames per second. We've got show PAL formats. That's more important in Europe, africa, asia and South America. I do not have that toggle turned on. And then I think another important setting is enhanced stabilization. So what this does is whenever you are in your video mode and whenever you're in your cinematic mode, the iPhone is going to capture 4K at kind of the furthest zoomed out range. But what it does is it then kind of zooms in digitally to crop out the edges. And by doing that what it means is it has some extra footage to play with on the edges of the frame so that if you are moving your iPhone, as we all do, because we're all human and have subtle movements that we have while we're walking or taking the footage, if we're just holding it in our hands, it can use that extra range on the outside to help to stabilize the footage. So if you want to be able to kind of get all the way out to the edges, you might turn off stabilization. It's good if you have a tripod or even a monopod, but for most of us just picking up our phone and shooting. Having that enhanced stabilization turned on, I think, is great.
The next setting is action mode lower light and what this does is, if it's toggled off, then action mode is going to essentially action mode. With it turned off is going to kind of run without consideration for the lighting, Expecting that you will consider the lighting, so that if you're going to use action mode and I'll explain that in a moment Then it is going to expect that you're going to do it in an area with enough lighting. Most of the time that's going to be outside. That's where action mode was really meant to be used, but with this turned on, it will decrease the stabilization in order to optimize for a scene that might not be as bright, and it has to do with the image signal process. It was a very complicated reason why that needs to be turned on, but if you find yourself using action mode, for example, indoors more than you do outdoors, you might want to have action mode lower light turned on. Action mode is a more advanced version of the stabilization that is built into the software for the iPhone With action mode turned on.
I took a video of a fountain in San Francisco and I held up my iPhone and I quite literally ran from one side of the fountain to the other side of the fountain Capturing the video. So you can imagine that as I'm holding my iPhone, it's jostling about the video that I got in the end very smooth, very nice looking, and that is because of action mode and also because it was outside during the day. We had plenty of light. Hdr video you can turn that on or off, and essentially what that does is it will record in what's called 10-bit high dynamic range, and so if you shoot with HDR video turned on, then it's going to have Dolby Vision compatibility, so on displays that support Dolby Vision, you'll be able to see the video in that high dynamic range.
Next is Auto FPS and essentially with this again, the more light you have, the better a higher frame rate video is going to look. So if I were shooting in 4K at 60 frames per second but I'm in a lower light area, then the phone may decide to go ahead and drop that to 30 frames per second instead in order to improve the video, and also in that case it's going to optimize for file size, because the idea is if you were to shoot it at 60 frames per second in a low light area it's not going to be worth it to have that video. It's going to look crummy. So they feel you might as well drop that frame rate. You might as well have it at that 30 frames per second, because in that case you're going to get a better looking video and in the meantime you're also saving on storage space. So why not only use more storage space when we need and can successfully create a good, high quality video and then lock camera and lock white balance with these?
When you launch the video portion of the camera, if you have lock camera turned off, it's going to reset it to the defaults that you set here in record video. However, if you turn on lock camera oh no, excuse me, that's in a different place. My bad, this is where it won't switch between cameras while recording video. So in this case, if you are zooming in, if you are making little adjustments, then it's going to kind of keep it in that place and make sure that you don't accidentally toggle into something else. And then, of course, white balance without this setting turned on, the white balance is going to change based on what comes into the frame. If you lock that white balance, then the first white balance you set whenever you hit video record. It will stay that the whole time. That is, I think, a very important setting, depending on what you are shooting, because it can be distracting if the white balance changes quite a bit from one to the other. Now we'll go into whoops.
Record slow mo next, and I promise these are much shorter so it won't take as long here and I believe personally that you should just set this to as high as you can get it, because if you are shooting slow motion video, the higher the frame rate, the better the slow motion footage is going to look, because what's happening here is and the two options are 1080p HD at 120 or 1080p HD at 240 and what's happening here is the camera is capturing 240 frames and then when you play it back, it's going to play back at a much lower frame rate 60 frames or 30 frames per second and so you're going to see a very smooth slow motion and it's going to look much better the more frames that you have.
So I personally like to have it at that higher frame rate, with the understanding that, of course, that video is going to be a little bit bigger 170 megabytes for a minute of 120 frames and 480 megabytes for a video at 240 frames. And then, lastly, record cinematic. Here again we go back to that cinematic video where you can shift the focus of the video after the fact and I have this set personally to 4K at 24 frames per second, because it is a cinematic mode, right, I want it to look like it's in a movie if I'm going to use this, but I don't know, I don't really use cinematic mode, do you, rosemary?
0:13:03 - Rosemary Orchard
No, I don't use it all that much, Micah, but I have to say one of the reasons why I didn't really use it is because I didn't really understand it for quite a while, and so I went on Apple's support website the other day and I found they've got a really great guide on using cinematic mode which we can actually link to folks to in the show notes, Because they have a guide for using cinematic mode.
They've also got a guide for using night mode on your phone, which is something I do a lot Because I am often taking photos in non-optimal lighting conditions, and so having it have the ability to do a long exposure where it's going to take a photo and it's going to hold the camera lens open for a much longer period of time to try and let more light in so that you can get a nice photo without using the flash, it's a really nice trick. So I've been trying to figure out how to use cinematic mode and there is a whole little guide on that from Apple which will be very useful to folks, I'm sure.
0:13:55 - Mikah Sargent
Yes, we will have that link in the show notes, as we mentioned, so you can check that out and kind of get a little more out of it. So let's continue with the settings, and I really want this to be an incredibly helpful episode for people that can go back and kind of find the specific parts we're talking about. So I can understand if some are like, oh man, we're going through everything, but I think that this is important. It's important to understand how each of these sections work. And so the next area is formats, and this is one of the most important settings in the camera app, because this is going to determine what type of video or photo you are capturing, based on what camera your video camera, your standard camera you're using. So the first thing and I also think that it's helpful to just know what we, as folks who use these devices and understand the stuff what settings we have this may and then I also like it could be an opportunity for folks to go you know, I have mindset to 120 frames per second, and the reason why is this. It's a little bit kind of showing off your Pokemon cards, if you will. So the formats here start with the camera capture. So again, we're talking about what photo and video format is your iPhone going to capture? And you have high efficiency and most compatible. I have mindset to high efficiency, and the reason why is because it is a very well created type of format that will allow for the most use of what's available. It's a little bit nebulous here, but the most use of what's available without taking up a bunch of space on your device. That's what the efficiency stands for, or means, and so what it means in the end is I can capture those 240 frames per second video or the very large photos, and not worry that it's going to take up so much space on my device. Right, and what's great is the iPhone. The software, has a built in method of converting a photo to another format. On top of that, a lot of the online photo storing services, a lot of the online photo sharing services, all support these high efficiency formats at this point, and if you ever have one that doesn't, it can be converted. So high efficiency is going to save photos and videos in HEIF or HEAF or HEVC format, if you choose. Most compatible, it's always going to use JPEG for the photo and H264 for the video, and then, for cinematic video 4K at 60 frames per second, 1080p at 240 frames per second and HDR video. Those actually require high efficiency formats, so if you want to use those, then you will need to have high efficiency turned on. Because it also is efficient in terms of its ability to take a capture and save it to the. Save it to disk, essentially save it to your storage on your phone. Overall, it's just a better format for capture, storage and then referencing later.
Next, if you are using an iPhone 15 Pro or Pro Max, you're going to see a lot of settings for this next area. Under photo capture, it's called photo mode, and what this means is what is the sort of camera profile that you want to use whenever you are using your default camera. So that's the main camera at one X. When I tap on photo mode, I'm presented with 12 megapixels or 24 megapixels, and I can choose and there again I misread this section. That's not until later. So this is about the size, excuse me of the photo that you are capturing 12 megapixels or 24 megapixels. So I tap on photo mode and there I'm presented with the two options. I have mindset to 24 megapixels. I've got plenty of space and so and to. I do want to address something in the chat. If you're using the high efficiency mode and you are using a Windows machine, you may have some trouble with Heath and HEVC. But again, you can always just convert the image into something else, to a standard JPEG and that's-.
0:18:32 - Rosemary Orchard
There is support for automatically converting your files when sharing them as well, which we can get to later. But also, if you do have an issue with high efficiency formats on Windows, I'd recommend double checking that you've got all the Windows updates installed, because Windows did introduce support for HEIC and HEIF Maybe not entirely as standard, I can't remember the details, but it should have support for it. So you folks should be good to go with all of that support everywhere. Beautiful.
0:19:00 - Mikah Sargent
So, yes, that's again the image size, whether it's 12 megapixels or 24 megapixels. Moving on, we have some options to turn on ProRaw and what size and resolution those ProRaw images end up being. So what this does is it gives me the controls within the camera app Rosemary is gonna show us the camera app and it gives us the controls within the camera app to make adjustments to ProRaw and resolution. And so you choose your default here, first by toggling it on so that you have that setting, and then, in the default, we have three options, depending on the iPhone that you're using, excuse me. There's HEIF max, which can be up to 48 megapixels. There's ProRaw at 12 megapixels or ProRaw max at up to 48 megapixels. Now, again, from the top to the bottom, the bottom being the most, the top being the smallest you are going to see that size increase. So if you want to shoot at ProRaw at 48 megapixels, understand that one photo is 75 megabytes, whereas a HEIF max photo at 48 megapixels is only five megabytes. I do have this turned on to ProRaw max, mostly because I wanted to take some photos in that format, but outside of specifically trying to capture in ProRaw so that I can have raw photos and work with those. Most of the time. I would have this set to HEIF max, because it is still capturing quite a bit of the data that's needed to take not only a good photo, but a photo that can be edited afterwards to make adjustments to brightness saturation.
This isn't a photography podcast, so I'm not going to go into a bunch of details about raw photos and everything that's involved there. I just want you to have a basic understanding of what each of these settings corresponds to, and of course, apple always offers a little bit of help text, although it's very small, so you can read a little bit more about that to understand what these settings mean, but also when they're kind of caveats. So, for example, 48 megapixels can be captured on the main camera at 1x. Night mode, flash and macro photos will always be saved at 12 megapixels. Live photos can be saved at 12 or 24 megapixels. So again, that's something to be aware of that if you're using night mode, if you have the flash turned on or you are taking macro photos, you're not getting that 24 megapixel photo, but instead it's going to be saved at 12 megapixels.
And then the last part of the format section we're finally here is whether or not you want to capture or have the option to capture Apple ProRes. So this, of course, is Apple's ProRes video format that gathers just as much data as it can whenever you're taking video. And, of course, apple points out that it is becoming, or is already in many cases, a very popular format for post-production. But understand that a minute of 10-bit HDR ProRes is about 1.7 gigabytes for 30 frames per second at 1080p, and if you choose to do 30 frames per second at 4K, that jumps up to six gigabytes for a minute of footage. So these are huge files and that's just something to keep in mind is that you might want to, if you've got one of the new iPhones, plug in a USB-C cable and then plug in a external drive on the other side so that you can capture the video directly to that, where you might have more storage space. And then, last but not least in this section, is ProRes encoding, where you have the option to choose HDR for high dynamic range, sdr for standard dynamic range or log, which is a format that folks who do color correction in video after the fact are very familiar with, and it essentially think of it like raw photos, if you take a raw photo off of a DSLR and you look at it in your photo application of choice, you're going to see kind of a grade out, washed out photo, right, and the reason why is because it is trying to capture as much of the blacks in the photo as it is trying to capture as much of the whites in the photo, the full range of luminosity, the full range of exposure, everything that's there and so by default it's going to seem kind of grade out. And then what you're supposed to do is grade G-R-A-D-E the photo or the video, in this case after the fact and bring up or down those shadows, bring up or down the brightness and make those changes based on excuse me, I said brightness but highlights and then make those changes to get what you want. So if you are trying to shoot and capture as much information as possible, log would be the way to go, but only if you know what to do with log after the fact.
Alex Lindsey talked a little bit about this on the episode where on MacBright Weekly where we covered the new iPhone. So that's everything to know in formats and let me quickly go through preserve settings, because this is what I meant to mention earlier when we got to the lock camera section. This is that lock camera section I was talking about In preserve settings. What this does is it says when you go into the camera and you make a change to something, I want that change to stay, and Apple gives you the ability to essentially turn this on for many of the settings. So I can say the camera mode that I set, I wanted it to stay on that. So, for example, maybe you regularly take video and not as many photos. Well, the next time I opened the camera app I wanted to switch right to video or be already on video.
Essentially Creative controls, like the last filter that you use, the last aspect ratio, so maybe you'd like to take square photos regularly. You can have that kind of stay locked, the light setting and then, if that actually gets automatically reset, if you want to have that brightness, stay the same. Depth control, macro control, exposure adjustment, night mode, portrait, zoom, action mode, pro-raw and resolution control, apple ProRes and live photo. Basically all of those settings you can say when I set them, don't change them, don't change them back to the default. I want that to stay the same when I launch the camera app again. I have almost all of those turned off, because I do want it to go back to the default so that I can make the change in the moment, because I might be taking a photo or a video. I'm probably not wanting it to stay in that special setting that I had before, and then I can quickly go through these next sections.
Record stereo sound will, of course, let you use the multiple microphones within your iPhone to record stereo sound, so it has a left channel and a right channel. If you turn this off, it's just going to do a mono audio recording. Use volume up for burst. So when you've got the camera app launched and you are in photo mode and you're in the standard camera mode, if you use volume up and you hold it down, it will take burst photos. It will take multiple photos, one right after the other, and then let you choose from those photos which one, or perhaps more, that you want to keep. What's great about that is the system will automatically select what it thinks is the best one. You can go in and say no, actually I think this was the best one, if you want, and then it gives you the option Do you want to delete the rest of these burst photos? Do you want to keep them.
Scan QR codes. With this setting turned on, you can launch the camera app, point it at a QR code, the image signal processor, the system will detect that there's a QR code in the frame and then we'll present you with a link to whatever the QR code is linking to and then show detected text is the ability to hold up your phone to, say, a poster, and then have it notice that there's text on there, and then you could easily copy the text that you see or act on it. If it's a website, if it's an address, if it's something like that, you could route to it from there. Under composition, we've got grid level mirror front camera and view outside the frame. With grid, you turn on, as you might imagine, a grid in the viewfinder for your camera. With level, you can choose to have the camera have a little level in the middle so that you know if you were holding the iPhone perfectly square or not, and so it's a very handy way to kind of line up the shot exactly as you want it. Mirror front camera will, as you might imagine, take the view of the front camera and mirror it, because that's kind of what you might think you should be seeing as a representation of yourself and then view outside the frame. This is an interesting feature where when you are taking a photo and you're in the camera view, the software will show you not just the view and the lens that you're in, but will also have the ultra-wide lens that is kind of outside of the frame, displayed in the UI around the photo, so you can kind of get an understanding of where you are as you're taking the photo. I think this is very helpful if maybe you're trying to take a far away shot and you know that the deer you're trying to take a picture of was near a pink rose bush right, and so you're kind of scanning along trying to capture it Right outside of the frame, you can see what's out there and help yourself to kind of align. And then what's great is that, depending on sort of how the ISP, the image signal processor, sees the photo after the fact and captures it, and how you choose to edit it, you may have access to what's outside that frame and you can bring that into the photo as well. All right, let me quickly go through what's remaining in this section before we take a break, and then we'll come back and talk about what the camera app itself actually looks like.
The next section was a relatively new introduction to iOS called photographic styles, and with photographic styles it is a way to kind of speed up the process of editing your photos, where the default settings that you want to have for your photos can almost be baked into the image from the get go. So if I tap on photographic styles here, you will see that there are multiple options. There's standard, which does nothing to the tone or the warmth of the photo. There's rich contrast, which subtracts the tone by 50%. So what this does is it darkens the shadow, it makes the colors a little richer, and then there's also more contrast in the photo. There's a vibrant which bumps that tone. So it's gonna be very bright, the colors will be vivid, and what's great about all of these photographic styles is that it still maintains a natural look. Nothing is overblown. That's a setting that you can do after the fact if you want to. Then there's warm style, which brings the warmth up. So this is going to kind of provide a sort of golden glow to everything. It's going to make the reds feel richer, the yellows feel richer, or the cool style, which is going to make things feel a little bit more blue, so blue undertones and a more cool photo. I currently have mine set to standard, but I have in the past set it to vibrance and again, when you do this, it kind of just in the background, sets some color options for your photograph and then, while you're looking through the viewfinder, it's going to display those as well, so you're going to get a better idea of how the photo looks. I think this is great because, again, some people don't really want to do a bunch of work afterward, but they know how they like their photos to look on the whole, and so this is a quick way to kind of get that shortcut and have that color.
Now this again, I had mentioned this earlier, but this is the feature, or, if you've got an iPhone 15, you are going to see lots of options here. What happens with this is, with that main camera, you have three different lens profiles. There's 24 millimeters, 28 millimeters and 35 millimeters, and each of these you can access by tapping on the 1x button in the camera app and choosing one of the three. But on top of this, you can set a default zoom that is equivalent to a 24 millimeter lens a 28 millimeter lens or a 35 millimeter lens. Many of you are probably familiar with the 35 millimeter lens. I set mine to 35 millimeters but I do think that I'm going to end up switching it back to just that standard 1x. But the way that it goes about mimicking the 24, 28, or 35 millimeter actual lens is by slightly zooming in digital with the photograph so that you get kind of captured within that 1.2 or 1.5.
Next are portraits and photo mode. This is again. I love this feature. It's a new feature that it only works with certain iPhones, based on whether you have a new enough chip in your iPhone for the processing. So I believe this is an iPhone 15 exclusive feature, though I have heard some folks say it was on their iPhone 14s. Basically, you never have to turn on portrait mode when you take a photo, so you can take a photo standard and then it will go ahead. If it feels that the photo is a portrait of a pet or a human being Well, I shouldn't say a pet, because it's only dogs, cats and then human beings Then it will automatically capture the depth information of the photograph using the sensors that it has for depth, and then it will give you the option, after the fact to change it into a portrait photo, to use that portrait mode that has the ability to change the depth and add that bouquet blur effect. It's a really cool feature that I was appreciative of, because I don't like using portrait mode really, but it may be that a photo that I took could look good with portrait mode, and so I'm always able afterward to go in and go let's see what this looks like in portrait mode and see if it's something that I want to turn on Almost there.
The next setting is prioritize faster shooting, and essentially what this does is, if it needs to, for the sake of processing, for the sake of image quality, for the sake of capture in the moment, it will let you prioritize faster shooting by dropping the image quality a little bit. So when I'm taking a photo, I want it to get the photo as quickly as it possibly can. I don't want any waiting for the photo. By prioritizing faster shooting, you may lose some image quality that you may or may not recognize as actually there, but in return, you can make sure that that moment that you're trying to capture is actually captured fully and completely, and so that's just up to you. Would you rather perhaps you know perchance lose that moment but get a higher quality image? And again, that's only. It might be that you lose that quality or run the risk of losing a little bit of quality, but at least you get to capture that image. So that's not a setting that I kind of give advice on outside of just understanding what each of those means.
Lens correction there is going to be some distortion on the front camera and on the ultra wide camera, especially because of the nature of physics and the way that that's captured, and so with lens correction turned on, it will go ahead and try to undistort the image and make it look like it actually should. It's kind of fun to turn this off, just so you can see what it looks like when it's not on, and then that will give you an idea of whether you want to keep it on. And then, last but not least, is to have in the in the UI for the camera app, the ability to choose whether you have macro photos turned on or off. So the iPhone, by default whenever you are taking a photo, if it senses that you're taking a macro photo by placing your camera very close to an item, it will switch into macro mode With this setting turned on in the settings. Then the macro icon will appear in the UI for the camera and you can tap it to turn it off. So you may not be trying to do a macro, or maybe you're trying to kind of get something blurred in the foreground, but you're really capturing something out in the background, but macro mode keeps turning on automatically, and it's annoying. This is a way to make sure that you have control over that, so toggling that on will give you control over macro. Wow, we just ran through all of the settings for the camera app, and when we come back from the break, we will talk about what you need to know about the actual camera app itself as we continue on with this episode all about the iPhone camera.
Before we do that, though, I want to tell you about a very appropriate sponsor for this week's episode of iOS. Today, it's Milio. You have probably heard how much we've come to love Milio photos. It's the solution to digital management for photos, videos and even documents, and what's great about it is it's free, and their latest round of updates are giving us even more to be excited about. Milio has refined its search and grouping tools offering incredible cataloging and access for your important files. Milio photos automatically assigns AI smart tags to your files and, with their updates to dynamic search and quick filters, you can find specific photos incredibly fast. It's a great way to comb through that huge photo library to get at what you're actually trying to find.
I want photos where everyone in the photo is smiling, there's a dog and we're at a beach. Oh, suddenly I've got access to all of those photos. But here's what's great their new spaces tool really changes the game. With a spaces tool, you can easily determine what's visible and what's not, opening the door for more engaging collaborations at work or even just sharing with the family. You can create custom categories into a quick collection that is easy to share, so that I and other Milio photos users can collaborate on editing, managing and even sharing media in any given space. It's really great to have the option to keep these spaces private, either with passwords or with a pin, and that way you get extra security when you're sharing spaces. So think of it as a kind of place for people to go to edit photos together, to organize photos and documents together. Perhaps you are working with your marketing team and so you are capturing photographs of your latest product. Wouldn't it be cool if you had a place to go where you could say, hmm, I really think we should bump the brightness on these photos or, oh, I want that to be a little bit clearer? That is where spaces can come in handy.
I use Milio across all of my devices. My Milio photos are synced from a Mac studio to all of my other devices and I've talked about this before. I really do love those AI features, those AI smart tags and the fact that this stuff is happening on device. I really appreciate that, because it is a little troublesome. The idea that I have taken photos of family members and friends and if those photos are being synced to some online service that then is taking that person's face and cataloging it kind of gives me the heebie-jeebies a little bit. But this on device understanding face scanning is much better, because at least I know that it is all happening right there on my computer and, should I choose to remove that information, I am able to do so.
With the Milio Photos Plus subscription, all of my devices connect in one library. This is what I was talking about no cloud storage required and with offline storage, I don't need to rely on the cloud to keep these files accessible through devices, but I can also create new backup systems and know that those files are secure. So you out there should download Milio today for free and see what has us so excited. Get Milio Photos on your computer or mobile device. Please go to our special URL. I know you all out there can hop into the app store and do a search for this, but if you do it this way, I promise you will get to that app link. But that way Milio knows that we sent you there Miliocom that's M-Y-L-I-Ocom. So download Milio Photos for free right now at Miliocom.
Thank you, milio, for sponsoring this week's episode of iOS Today. What a totally appropriate episode. Alright, we are back from the break. We're talking about iPhone camera tips and tricks. I just regaled you with the wonder that is the. That are the settings for the camera app and, rosemary, I was hoping you could tell us a little bit about the camera app itself.
0:41:34 - Rosemary Orchard
Yes, micah, I certainly can. And before I do that, I do just want to take a moment to mention to folks that some of those settings that Micah was talking about earlier, I actually do have some of those enabled, specifically on my phone. I have the options for grid level and also view outside the frame on. So if you are watching the video and you're looking at it and going, huh, her camera looks different to mine. It might be some of these settings that we have been talking about earlier. So, to start with camera, going into the camera, there's a whole bunch of ways to open the camera. You could set the action button if you've got an iPhone 15 pro or 15 pro max to open your camera. You could just swipe down into your, into your control center and open the camera from there. Or, of course, you can open it by swiping right from your lock screen.
Now I happen to have a handy, dandy little octopus here. I did try to get a cat for today's episode, but unfortunately she was not cooperative about moving house for a an episode by us today. Very rude of her, but all that means is that any live photos that I take of this cute little octopus, which it can turn inside out again. It'd get a little cranky if I wanted to in a vibrant shade of pink, but the blue side is happy. Live photos will automatically offer me the option to do portrait. I would have to take a portrait photo of this.
But there are a whole bunch of icons here in the camera app and they all mean different things. So it's a really good idea to take a little bit of time to figure out what some of these are. So I'm going to start on the very top left and I'm going to work down towards the bottom right and I'll explain what some of these mean. So first of all, in the top left of the camera app, we have a little lightning icon. Now on my phone right now, this is a white lightning icon in a white circle.
If I tap on it then it gets a line going through indicating that the flash is off. And if I were to put my phone down onto my mouse mat, then you might see, if you're watching the video, that the flash is turned yellow, meaning that it will use the flash, and this is how you know which settings are actually enabled versus an option and disabled. So it's an option If it's white, it's enabled If it's yellow and it's disabled if it's got a slash there, the one next to that, it sort of looks like a moon with lines coming out of it, kind of like somebody's you know draw on a moon with chalk and then sort of smudged it out during dragging their fingers over it.
0:43:56 - Speaker 2
That one is night mode.
0:43:58 - Rosemary Orchard
Yeah, it's a night mode one. So again, I can tap on it to disable it, and then, if I bring my phone down towards the mouse mat, if I disable the flash, then I can get the night mode to enable and it will show me when it's yellow, something like one s or two s or even three s next to it, and that is how long I will need to hold the camera steady for to do that long exposure that I was mentioning earlier, so that it can take a photo that is appropriately light. The one in the middle is a little up arrow. I'm going to skip over that for the time being and come back to it, because that enables a whole bunch more actions that you know it's great to have, but we don't necessarily want to talk about those right next. So in the top right hand corner I've got HTIF Max as an option, and if I tap on that to enable that because that had a slash to it then the live photo option, which is a sort of target of circles which is in the very top right that gets disabled. So it's either live photo or HTIF Max as an option.
Now, in the middle of my screen I have my view finder and I have my grid on this so I can see the actual images. And if I were using something where I could actually see outside the grid, then that would show up. Now what I'm attempting to do is get the level to appear on the screen and I might just flip my camera into landscape mode and see. There we go. So it's kind of difficult to spot, but there is a level that has appeared on my screen. It went away then where it was right in the middle, and there it's a sort of white line and there's two little horizontal lines either side of it. Now, as I tilt my camera to line it up, that turns yellow, indicating that I'm now level, and it disappears. And that is how I know that my phone is level for taking a picture where that sort of thing matters. It doesn't matter all the time, but it can be very useful when you need that. Now I'll flip my phone back into portrait just so that when we're going through the orientation of all the little icons, everyone knows what we're talking about. Now, in the bottom left of the camera, I have a little flower icon. Now this is lit up yellow right now, and this means macro photo, and so I can disable macro photos by one or enable it, and it turns on automatically. If I were to sort of move away, I've got a couple of things on my desk because I was going to show off the text recognition and so on and various other options. Then the macro goes away and it's only when something's kind of close in front of the camera lens and then right in the middle above the shutter and above all the text options that we have.
I have my different lenses here, and so there's 0.5, there's 1x, 2x and in my case, because I've got the iPhone 15 Pro Max, I have a 5x. Now what you can do is you can just tap on any one of these to use that zoom level. That's an octopus of 5x, it's a cuddly octopus, so it's not that scary and that's 2x. But something that you can do which some folks don't necessarily realize is if you drag on this, then you get a wheel giving you all of the different options where you can zoom in. So if I want something like 0.7x, I can do that. If I want 7.0 or a 10x even, or 25x, I can do that. So anything above 5x is using digital zoom rather than an optical zoom, and so that is, you know, digitally zooming and cropping your picture to give you the results of the you're getting, but it's still going to be as good a picture as possible. So you've got those options and, depending on what you've set up, then it will be remembering those or not remembering them. As you see fit. Underneath this we have a series of words. Now, obviously, if your phone is not in English, you're going to have different words here. So you know, mileage may vary, but we have options, starting with time lapse, which a time lapse photo is, where it's going to be taking sort of a photo every few seconds and then it stitches them all together into a video.
Slow-mo is the opposite, where it takes a video and I'll try and get the octopus to move in a speedy fashion so I can demo that and then, once we've got our video, when it plays back it will hopefully have picked up something. And there we go. The octopus disappeared in super slow-mo from my frame. Cinematic mode there's a great guide on the Apple website. I'm not going to try to explain how it works now, but that is an option.
Now you'll notice that in some of these modes I don't necessarily have all of the camera zoom options. So in slow-mo I had 0.5x, 1x and 5x, and in cinematic I have 1x and 2x. This will depend both on your phone and which camera mode you're in. Similarly, the options at the top might change. So you could have an F for focus so that you can choose what kind of focus you're looking to do, and if I tap on the right option, then that would be better.
Video Video is a much more common option, so I'm going to do a little bit more detail on that for folks. Now in video mode in the top left I've got the flash option again, and then I've got ProRes HDR as something that I can turn on or off. When I turn that on in my case, it says it's a maximum of 81 minutes that it can record for, and when I turn that off, it doesn't have a max for me anymore. In the top right I have an icon of a person running, so they've got some lines coming out from behind them and this is currently got a slash through it, and when I turn it on, it turns on action mode. Now, in my case, I'm recording in my office it looks quite bright, but down here on my mass-med it's kind of dark so I wouldn't need more light to do that. But then I've got options for HD which, when I tap it, switches to 4K. And then I've got 30 frames per second which, when I attach a tap, it switches to 60 frames per second.
Relatively simple Portrait mode is that fabulous effect where you get a lovely bokeh behind whatever it is you're focusing on. So if folks are watching the video, then they can see that my octopus has got a blurry background behind him, or I'm not sure. I've never checked whether my octopus is male or female, so let's go with them and my mouse is blurred out. My stream deck back here is blurred out, as is the back of my mouse mat, but here in front of my octopus, things are in focus. Now I can choose between various different effects here, but you don't have to spend hours setting up your portrait mode and choosing the perfect effect. You may decide later that you want it to use stage light, but if you've taken a picture, when you edit that photo, then you can actually tap on that portrait option and then you can change it to be any of the other options that you might have wanted.
So if I wanted to switch this into a high key mono photo of my little cuddly octopus. I can do that. That's one of my many options. Now there's also a little hexagon up near the top right here for my portrait photo, and this only appears in a couple of the modes. But essentially what this does is it allows me to control the effect of that light or that effect that is being applied, to, how much or little that is applied.
And then finally, we have pano. Now, pano photos are great. I'm not going to demonstrate how to do it, because it will take a while, but the thing to remember with pano photos is what you want to do. If you're trying to take a picture using panoramic mode and I'm going to try and demonstrate this on video for folks you want to get your arms and grab your phone and hopefully not have your headphones accidentally wrapped around your foot, because that's not a great idea when you're trying to stay connected to the audio, and so you want to point your phone and you kind of want to lock your arms at your side. You want to keep your phone as stable as possible.
Now, what I will do is I'll point my phone at my keyboard for this, but if I start to take a panoramic photo, okay, and I go up, okay, and I go across and I go all the way down. It'll tell me to move up, okay, and it's attempting. What you want to do is keep the the the arrow on the yellow line. Now, if we take a look at this picture, it's done a pretty good job of stitching my keyboard together, to be honest, but some folks with eagle eyes will notice that there's a like weird line at the back of my keyboard where my keyboard goes, and then it's like I don't know, at 16th of an inch where there's just like an end of a keyboard and that starts again. It's not a great photo because you know that that panoramic line didn't line up, but once you've got the hang of it, you can definitely take a whole bunch of pictures using panoramic mode and, more importantly, something that folks really should know If you want to take a picture of something super tall, yes, panoramic mode can go up instead of across.
So, for example, if you live near Disneyland or Disney World, they have huge Christmas trees and I mean huge Christmas trees and they're beautiful and if you want to take a picture of something like that, you can use the panoramic mode on your phone to take a picture. Similarly, you don't have to go all the way to the end of a panoramic photo. You can take a panoramic photo and when you get to what you feel is your stopping point, you just tap on the camera icon at the bottom again and it will stop taking the panoramic photo and that'll be it. You know, nice and simple. So I did mention before that I was going to come back to some more of these options, and that is with the arrow in the middle at the top of the camera app. Now I'm in the photo mode for this.
So obviously, the options that are available are going to depend depending on which camera mode you're using. If you're in cinematic mode, you're going to see something very different to in the camera mode. If I tap on that up arrow that goes from an up arrow that's white to a down arrow that's yellow, and then at the bottom, I see various icons, some of which we've already talked about, and these will give me various options. So first on the left is flash. Now I can change my flash from being automatic to explicitly on or explicitly off, and this works the same way as tapping on that, but it can be quite useful for folks who would like that little prompting reminder of what it is that that thing means. Similarly, we've got night mode, and then here I can actually adjust how my night mode should be working. Now, if I bring this down to my mouse mat, there we go. I've got a 10 second night mode. Now holding your phone still for 10 seconds is going to be pretty difficult, but it will switch and it will allow me to try and do a sort of half of that before it will toggle on. So night mode adjustment and the amount of time it's going to expose for is very much going to depend on how the light or dark the environment is where you're trying to take a picture. But you can control that. If you want to Live mode, you can have live mode on auto. That is the default, or you can say you can turn it on or turn it off.
Now Micah mentioned before those photographic styles that are available in settings. If you want to just experiment with this inside of the camera app itself, you can. And that is an icon that looks like three squares. They're sort of slightly offset. You know like you're looking at an image of, say, a folder, an icon of a folder that's kind of like off at an angle and there's three of them stacked behind each other. So you can experiment with some of those. So there's vibrant, there's warm, there's cool, and you know there's your standard option as well. So you know you can do, you can play with whatever it is that you like there In the standard option. You can also tap on the tone and warmth and adjust it to sort of create your own if you would like. I'm just going to set that back to standard so I don't have weird pictures going on later.
And then there's another option. Now, on my phone this shows up as four by three, and when I say four by three I mean it says four column three in a little circle. Okay, that's the aspect ratio of the picture. There are also options for square and 16 by 9. So that when you are taking a picture, if you would like to take an Instagram square picture, you can do that and that will show up as one colon one and then 16 colon nine. That shows up as 16 colon nine. Relatively simple, I usually leave mine as four by three, but depending on what kind of pictures you're taking, who you're taking pictures of, what you're taking pictures for. You may want to take them with square or other options. And there's another, there's a couple more options here, so I should note this bar here that's now showing, because I've tapped on that up arrow at the top, that bar that's showing between these zoom options and the take photo button. This does scroll, so there are some more options. Over towards the right there's one for that's got a plus minus circle and this is the exposure, so how bright or how dark you want your picture to be. And most of these options, if there are slider control, when you get them back to almost middle they will just auto snap back into their nice default places.
But the next icon, the next icon is something that some people go wait, why is there timer? Like, why do I need a timer in my photo app? And I'm just remembering the days when my dad would take Chris's pictures and he'd set things up on the camera, on the tripod and press it, and then he'd have to, like, run around and stand in the family group. And now you can use the camera remote on an Apple watch. If you've got one of those, that's an amazing trick because you can even see, like a little preview on your watch, but if you don't have an Apple watch or you want to play with the timers, you can do that right in the camera app. So there is a timer. Timer is off by default, but there is also a three second delay option and a 10 second delay.
Now, when you've enabled any of these, it will appear up in the top right between your photo capture option, which in my case is HEIF Max, and the live photo icon. So you'll see that, and then you can tap on that and it will reveal the options. The last option is more photo styles than you have in the camera settings and the previous three squares. I'm not quite sure why this is duplicated, to be honest, but they have options such as dramatic warm and dramatic cool, so everybody who needs a little more drama in their life when they're taking pictures the llamas can have them. Now. This is all fabulous stuff and I would highly recommend that you check it out.
But there is one more little thing that I wanted to show folks, because if you have an iPhone which folks listening to the show or watching the show probably do you should open the tips app, because the tips app has two sections in it, which I think folks who are listening to today's episode are really gonna wanna check out. First of all, there's a photo section and secondly, there is a camera section which can tell you how to quickly take pictures using swiping from the lock screen, things like that, using the volume button to take a picture, how to capture steady video using that action mode and also adjusting focus and exposure. So Micah already mentioned that we're not a photography show. We don't pretend to be photographers and so on, and we can show folks little bits of things, but if you want more detail on how to use things like focus and exposure, I'd recommend checking out this tip in the camera app, because then they also have a little link which will show you how to lock your focus settings and things like that, so you can learn more about the camera and how it works right there.
Now I did want to mention if you are trying to take a picture of something in particular, you can tap on that thing in your picture and then, as you move your camera, it will attempt to keep the focus on that item. Now the setup that I've got here is not great, so I'm gonna put a couple of other things in the shot which I've grabbed from other places around my desk to see if I can set this up. So I've just added I've got the Nike Pride, not Nike Pride, the Apple Pride watch band. Here I have a lip balm and I have some tango popping candy which I want from a fair and I'm gonna just tap on the octopus and then if I sort of accidentally flop the camera strap, the watch strap in front of it, then you'll see it did adjust the focus and it did that by showing me a square with a sunshine next to it, so as I move things around, that focus will stay the same, so that I know what is working or not being focused.
Oh dear, something might have. There we go, there we go. But yeah, as I move the things around, then you can see where the focus is remaining or not remaining, as the case may be. Now I do have recognized text on and it should be recognizing the text. Here we go, and so it's. Actually. You can see it's got a little flashing border if you're watching the video around the text that is recognized here on popping candy. So that can be quite useful.
And there's a little icon that's appeared in the bottom right and that is showing me that there is text that's been recognized there and I can just tap on that. I don't even have to take a picture to be able to select it, copy it or look it up. And that is just such a cool thing. That's right there in the camera app and, honestly, I use this all the time. When somebody's sending me or showing me an image of some texts, it's like I'm just gonna, I'm just gonna deal with this in a way that makes sense. So I actually have text here that I can search for, so I don't have to figure out how to spell supercalifragilisticealiditious again For this for another time.
1:01:38 - Mikah Sargent
I'm so sick of it. Awesome, I mean. Look, that's the thing. I think that the camera app gets more and more complicated the more time goes on and new features get added, but I do think that Apple's UI designers have done a good job of putting these settings in the proper places, that it is somewhat intuitive, I think. All that it takes is for someone to understand what each of the settings mean, and that's what we hoped to provide here today, so that you can get the full power of that app and be able to take the photos that you wanna take. There are loads of podcasts, including even on our own network with the once the once active I guess I should say hands-on photography, but that still has all of those wonderful tips and tricks about taking photos, what you need to do in terms of brightness and saturation and color balance and all that kind of stuff. But it starts with actually capturing those photos right, and that is what you can do on your iPhone and what we wanted to help you be able to do. Of course, as always, if you have special tips and tricks that you've told your friends or family members about, that we might have missed. Love to hear about them iOS today at twittv, but I think it's time for us to move along with the show.
We will talk about the news now, and that starts with an interesting couple of days. We had heard rumors leading up to today that Apple was maybe going to hold an event today or was maybe going to make an announcement today of new iPads. Now, only some online sources said that there was going to be an announcement of new iPads today, while others said that we would not get any new announcements of iPads today. But what was kind of underlying all of this was talk of a new Apple pencil, and I think what ended up sort of confusing folks and maybe leading them to think that there was going to be an iPad announcement today is it is a little odd for Apple to announce it would be a little odd for Apple to announce a new Apple pencil which is used with the iPad, but not new iPads to go along with them.
However, this very morning, as we record this show, on Tuesday, october 17th, apple did just that. The company introduced a new Apple pencil that is a sort of budget Apple pencil that exists in the space between the first generation Apple pencil and the third or the second. Let me try that again, because it's yeah, yeah, yeah. No, it is the second generation, so that exists in the space between the first generation Apple pencil and the second generation Apple pencil. It is the USB-C Apple pencil, and so that is what is here. So, rosemary, can you tell us a little bit about this new Apple pencil with USB-C?
1:04:57 - Rosemary Orchard
Yeah. So I'm sure some folks will remember that first Apple pencil the Lightning Apple pencil you'd take off the cap and then you'd stick the Apple pencil into the lightning port of an iPad to charge it. Now you could also plug it into a Magic Mouse to charge it, or an iPhone or various things, and so you'd have this giant square with long, skinny bits sticking out the end to be charging it. And this was a method for charging your Apple pencil but was introduced with that first Apple pencil Wasn't great. So when the second Apple pencil released, which is compatible with a whole bunch of iPads and it's the one that magnetizes onto the side, it's got that flat edge. A whole bunch of folks, myself included, rejoiced and that Apple pencil has a whole bunch of features that the first Apple pencil didn't. But the problem was is not every iPad supports that kind of Apple pencil. So you had a Lightning Apple pencil and now Apple's going USB-C everywhere. So Apple's added this USB-C Apple pencil, which is a halfway house between the Apple pencil first generation take off the cap, plug it into the Lightning port and the second generation magnetize on the side and magic happens. So the new Apple pencil USB-C specifically, it supports the same as the first and second generation with the Pixel Perfect Precision, as they refer to it, the low latency, tilt sensitivity and tilt sensitivity. Now it doesn't have pressure sensitivity but it does magnetically attach to the side of your iPad and it supports the Apple pencil hover feature on iPad Pro.
But there are two other things, or three other things sorry it doesn't have. There's no wireless charging and pairing, so you have to plug it into charge it. So, unlike the first one, where you have a cap that you take off and you can lose it, it sort of slides open to reveal a cap. So it's like sliding open and then you plug in a cable in between. And it also doesn't have a double tap feature, which I actually use quite a bit on my Apple pencil to switch between tools, and by default in most apps this will switch between, say, a pencil and an eraser.
The other thing that it doesn't have as an option which I don't know how much folks would be interested in or not it doesn't have engraving as an option. You cannot get this Apple pencil engraved with your name. Only the Apple pencil's second generation supports engraving, but in comparison to the first Apple pencil, the only thing that it has lost is pressure sensitivity. Now, I know a whole bunch of folks aren't that interested in having the pressure sensitivity on their pencil. They feel that the handwriting is not that good and they'd rather just have a consistent line thickness. But if you do want that, then obviously you'll have to look at the second generation version, but this one is available for, I believe it is $79, yeah, $79 for folks in general from the start of next month or folks with an education discount $69.
And it does work with all iPad models with a USB C port, including the iPad 10th generation, iPad Air, 4th and 5th generations, all 11 inch iPad Pro's and the 12.9 inch iPad Pro's from third generation onwards, as well as the sixth generation iPad Mini that's the tiniest one that is currently out with the touch ID at the top. So, yeah, I feel like this is a good option for folks. It is $50 cheaper than Apple pencil second generation, which is compatible with the iPad Air, iPad Mini and iPad Pro models. And, yeah, it supports most things that you would probably want, not supporting the wireless charging and pairing. Maybe a little bit of pain, but how many folks actually want to use their Apple pencil with multiple iPads anyway? Right?
1:09:00 - Speaker 2
I feel like that is a reasonable compromise to make there.
1:09:03 - Rosemary Orchard
Wireless charging is always nice, but it really depends on your use case, and I know some folks don't really care about that and they quite like to just be able to plug it in and charge it, because these things charge pretty darn quick anyway.
1:09:16 - Mikah Sargent
Yeah, I think this is a great price point. It maybe gets more people into using the Apple pencil and outside of, folks who are doing like true artistry on their iPads you know who would use a Wacom tablet in other places. This is gonna be great even for people that are doing sketching and stuff like that. It's just the pressure sensitivity that's lost in terms of its ability to draw and sketch on an iPad. So if you're not doing that full featured level of artistry, you're going to get a lot of what you need for a much better price and frankly, I think that new charging ability is pretty cool. The sliding cap is just kind of a cool bit of hardware construction, so I wanna go check one out just for that. I just wanna see a little. It's a fun little fidget too right.
1:10:10 - Rosemary Orchard
I love the fact that you can't lose the cap anymore, because I know there was like a whole bunch of people selling like replacement Apple pencil caps on Amazon that weren't official. You could get them in like different colors and stuff to be like yeah, I lost my Apple pencil cap but I got a new one in purple or black or it looks like an eraser from one of those standard school pencils or whatever it is.
1:10:28 - Mikah Sargent
Yeah. And then there's one more new story that I thought was kind of neat. I saw some people kind of freaking out about this in a good way. Apple, according to I always wanna say Mark Bloomberg His name is Mark Gurman, I know his name is Mark Gurman, I know you, mark Hi, mark Hi, mark Gurman of Bloomberg, in his regular Power On newsletter, talked about a new device that Apple is working on Not for you or me, at least not directly, but something for Apple's retail stores.
That would allow the company to take an iPhone box with the iPhone still inside, sealed away and place it on this pad, and that pad could interface with the phone, power it on, update it to the latest operating system and then power it down, all without opening the box, taking off the plastic, any of that. So that when you get because because here's the thing if you are getting your iPhone directly after Apple has released them, then chances are you were probably getting the latest operating system on your phone. The, the, the phones were, in theory, flashed with the operating system that the company had just shipped. Sometimes we do have day one updates and that happens, but Later on down the line for people who are going in, you know, months after Apple has announced the new iPhone, who want to get a new phone. One of the first things they're met with is having to update to the latest operating system.
So if, on the day that you get the phone, the Person could quickly flash, or maybe even they just you know, they have the the intern back there, just Boop, boop after the other, regularly keeping them up to date, but if all this could happen without needing to open the box or do anything like that that's. I think this is a pretty cool Technology that the company is working on, and I'd love to see that happen in other places, because I certainly remember a Holiday season or two where we spent the whole first day with our new console or whatever it happened to be Sitting like this with our hands on our closed fists, or with our hands on our clothes, with our head with our chins on our closed Fists that's the word I'm looking for Waiting for the operating system to update and then the next day you get to finally play with whatever it is that you unboxed. I think this would be a great addition.
1:13:02 - Rosemary Orchard
Yeah, I think this will be very handy for folks as well, because you know there are folks who are happy to sit down in the Apple Store and Download the updates over their free Wi-Fi and you know they have a system set up in store when they will have, you know, the updates actually on a computer in store, so it's not gonna have to go download it from Apple servers which potentially are on the other side of the globe to where you are. You know they've got it cached so that you know the update gets downloaded sort of once and then installed. It can be installed on all those phones from that local machine. It's still not gonna be, you know, a great experience to like sit down and go to start setting up your phone and you're confronted with oh no, you have to set up this phone updated, wipe it and then you can restore your backup from you, from you know your phone, which is kind of kind of sad To do now, obviously, when you're buying.
Say, for example, if you were to walk into an Apple Store now and they had an iPhone 15 or 15 pro you know any variant of that you know available and you bought it you would be getting iOS 17 on there, but if you were buying an iPhone 14, those don't necessarily turn over as fast at this point, which is why they would want to be able to install updates. It looks like Apple is attempting to get this into all the stores by the end of the year, which is really great, so folks who are buying Christmas gifts will not have to worry about those not being up to date, though. That said, if you're gonna get somebody a console as a holiday gift, I definitely recommend you know, depending on the person updating it beforehand, so that they are not gonna have to sit there with their head on their closed fist on On on the day that they open their present waiting for the update to install.
1:14:42 - Mikah Sargent
Alrighty folks. That brings us to the end of the news section, which means I can hear the music. It's time for shortcuts corner. I Crowd roars. This is the part of the show where you write in with your shortcuts corner requests and rose mary orchard, our shortcuts expert, provides a response. Our shortcuts corner request this time comes in from Jake, who starts off with a very kind message Y'all are awesome. Hey, jake, you're awesome. I cannot figure out how to set a shortcut for placing my phone on the charger at night To trigger my nearby LED strip to turn off. I would prefer it to happen after 10 pm, please, and thank you. Oh, I like this. So as soon as my iPhone goes on the wireless charger, then, if it's, then if it's past 10 pm, please turn off the LED light strip in my bedroom.
1:15:45 - Rosemary Orchard
It's a really simple idea and I absolutely love this. And so you know there's there's a couple of different ways that we can figure out. You know if it's at night, you know you could check if the sun's up and the sun's down, or you could check if maybe your sleep focus mode is enabled. But Jake's given us a very simple option, which is after 10 pm. So I'm going to make an assumption, jake, that you're not gonna be one of those people that goes to bed after midnight Because you said 10 pm. So I'm hoping that you are following Mike's, you know advice and goals and sticking to good sleep. I do, and I'm just gonna focus on the after 10 pm Section of this. For now I won't worry about, you know, going into before you know 2 am or something like that. So in shortcuts, in the automations tab, we have a whole bunch of different personal automation triggers. Now the one that we're after here it's actually the charger, and so what we're looking for here is the charger automation. We will change this to run immediately and make sure that it's set to when your charger is connected. Now, this isn't a specific charger, this is any charger. So you may want to double check that you're home or something as part of this, but that's okay. Now I'm creating a blank automation here. I usually recommend folks to this as a shortcut, but I'm using a blank automation as my signal for myself that this is something that I created for iOS today, so I don't have random things turning on and off in my bedroom at various times of day and night. So what we've got is we know when this runs our that our phone is being put on charge. This is great.
So I'm gonna start by actually formatting the date now, because the date contains, like you know, the day of the week and you know the month of the year and stuff like that. We are gonna get a little bit fancy with this. So I'm using the format date action and in that date option, I'm just inserting the current date Very simple and then I'm going to change this. Whoops, I don't want a the the date in there at all. So I'm changing the actually the date format to custom and then I'm just gonna delete Everything aside from that capital H H. That's in there. So this is very simple because it will then give us just the hours. Okay, so if I run this right now, it shows me 18 because it is 18, 21 here. Now I know a whole bunch of you folks are in the US.
Don't worry, we're gonna use 24 hour time for this, but I promised you don't need to learn 24 hour time to use this shortcut, so so now I've got the hour, which is, you know, 24 our time. So 18 in this case. Don't worry, I'll tell you exactly what you need to know. We need to add an if statement. So I'm just gonna use the search, but you can also look in the scripting section to find an if action. And then we want if formatted date.
And then this is where it gets a little bit tricky, because you're looking at it and go huh, if it has any value, does not have any value contains. Yeah, this is not quite what we wanted. So I'm actually deleting that if action and I'm gonna show folks a nice little trick, because the hour is just a number, right? So if I just add a number and I tap in where it's called 42 life, the universe and everything and I select format to date and I pop that in, I'm just gonna run this again. Show folks it's still 18. But now when I add that if action which again you can grab from scripting or through the search in the shortcut sections. Then, because it's a number I've got is greater than or equal to, and this is exactly what we want. So if this number is greater than or equal to 22, which is 10 pm, then we're gonna turn off that light strip.
Okay, and I'm going to assume, jake, that you're using home kit for this, and so I am going to use the home action to control my home and I'm just gonna drag this into the if I've removed that otherwise statement, because we don't want that in there. And then you just need to use the set scenes and accessories and you will just need to select something. So I'm gonna just scroll down here into the bedroom section and there we go. I've got some lights in a little alcoves in my bedroom and I'm going to control those and have those turn off, and that's it. So you start by formatting the current date, then you add a number action with that format, then you use an if action to check if that number is greater than or equal to 22 and if it is, you set the lights off.
Very simple but very effective, and I really love this as an idea. I think I might have to implement this so that when I put my phone on charge, it starts automatically running my wind down series of events for me, where it dims lights and, you know, plays some lovely ocean sounds on my home pod, things like that. But there's there's so many things that you can do with home kit when you put your phone on charge. But, yeah, it's worth exploring what options there are out there beautiful.
1:20:32 - Mikah Sargent
That is Rather simple, and we like it when it's that way, and, of course, we'll have a link to that in the show notes. Let us move on to feedback and questions. The first bit of feedback comes in from Mike. Mike writes Hi, rosemary and Micah, thank you so much for a great show. Every week You're welcome.
When I'm working outside with dirty hands, I use my air pods to take calls and leave my phone in the pocket. Unfortunately, the screen still unlocks, and when moving around, my jeans love to pocket dial, press the mute button, hang up and whatever they feel like. Apple support said that there is no way to prevent an iPhone from unlocking the screen, and many support pages say the same. Is there a way around that annoying problem with automation, something like lock the screen after accepting a call with air pods or something similar? Greetings from Australia, mike. Now, mike, this is interesting because it sounds like it's specifically if you have an Apple watch that can unlock your screen that this is happening. Right, rosemary? I've never experienced an iPhone Unlocking on its own without some sort of authentication, and so that authentication would be Apple watch unlock, which, for folks who don't know, apple introduced this technology during the panini, otherwise known as the pandemic. We call it panini, so that the different services that Downrates content, where you're talking about the pandemic, don't downrate that, but those services we use don't do that anyway. That was a tangent, the. They introduced this, this new way of being able to unlock your phone, because people were, as they should be, wearing masks while they were out and about and their face ID was not properly recognizing them, and so the idea was, if you've got an Apple watch and you started your day by typing in the password on your Apple watch and you continue to wear the watch on your wrist because the watch does know when you've taken it off of your wrist Then it can Reasonably assume that you are you. You put on your watch, you typed in the passcode that you know and you didn't take it off, so someone didn't take it away from you and put it on their wrist and therefore, because it's connected to your iPhone, if you try to use your iPhone and the iPhone has trouble recognizing your face, it can go hey, apple watch, is he or they still wearing their Apple watch and is the passcode typed in? It is cool, we can unlock the phone.
So I've had this issue to where sometimes it'll be in my pocket, I'll go to pull it out and by the time I get it up to my hand and where I can see it, it's already unlocked. And Normally that would be okay. But because I've moved into a world where FaceTime is not FaceTime, where face ID is my means of unlocking, then I'm not as careful about how I like grab the phone. So sometimes I'll end up pressing stuff on the screen as I'm grabbing it out of my pocket and it's a whole mess. So the first thing, mike, that I would suggest. It's not super handy but you could, when you're in those specific situations, just turn off Apple watch unlock for your phone. But I imagine that that's an inconvenience because then you'd have to go back in and do that. But at the very least, rosemary could. Could Mike Set up some sort of automation? Where is there? Is there an option for when a certain Bluetooth device is connected?
1:23:55 - Rosemary Orchard
Yeah, there is, but the AirPods will most likely be remaining connected.
1:23:59 - Speaker 2
Oh, that's true.
1:24:01 - Rosemary Orchard
Mike's not on a call. So there are a couple of things that I wanted to suggest. First of all, if your watch does unlock your phone, it will also vibrate on your watch and pop up on your watch and say, hey, this phone was unlocked and there is a lock.
Oh, that's right lock phone button right at the bottom of that that you can do. The other thing I wanted to suggest if Mike does have an Apple watch which seems like it must be what's happening here or there's no passcode on his device, but if he does have an Apple watch, try using the Apple watch to answer, make phone calls and using the AirPods with that, because that's going them from AirPods to Apple watch to phone. Now this sounds like you're adding like a whole extra connection and things could be quite flaky. But in my experience calls on Apple watch are incredibly reliable. And not only are they incredibly reliable. If you're doing it through the watch, there's no reason for the phone to be involved. So your AirPods are connected to the watch and that's doing all the things. So your phone isn't doing you know, involved in this.
The other option, which is worth considering at the very least, is one of those cases that, like the, the auto box, have got some nice MagSafe wallets which you know they they MagSafe onto the back of your phone and go around to the front. But you can still use whatever case you like with it, or you can just get you know wallet cases that cover the front, something like that, so that then that is what is touching the front of your, your phone Rather than your pocket. Because I'm presuming what's happening when you put your phone into your pocket You're putting it in so that the screen is facing your, your leg and therefore that's going through the material of the inside of your pocket and that's causing, you know, these touches that it's it's misinterpreting, is doing whatever it is on pocket dialing folks. The other thing you could try, of course, is just put your phone in your pocket face out. If you've got, you know, trousers that are made of a thicker material, then that could definitely have a positive effect on this.
But I would try answering and making calls through your Apple watch. You can still pair your AirPods to your Apple watch and then do everything with your AirPods, the same as you're doing, but if they're just connected to your watch instead of your phone, then that's definitely an option. But, yeah, keep an eye on your Apple watch, as you mean that you do have one, and when that Unlocked iPhone option comes up, you can just tap unlock. And if it isn't that you've got an Apple watch, please do write in again and let us know, because I would be super interested in figuring out what on earth is going on here if it isn't an Apple watch.
1:26:25 - Mikah Sargent
Yeah, the next one comes in from Ken and I'm oh I'm nervous about this one because I don't know if we're gonna have good advice for Ken. Ken writes in hello, I am a twit subscriber and I love your show. Thank you for subscribing to club twit. Those of you listening to it TV slash club twit.
I use my iPhone 15 Pro to take pictures for items to sell in online auctions. The pictures are mostly the top-down view. After taking many pictures I have to go through my camera roll and rotate most of them to the Correct orientation. Is there a setting in the camera app to say which way is up and which way is down, to lock the Orientation of the photos? Or perhaps there is a different camera app you can recommend? I also have trouble with the camera changing which lens is taking the photo. One of the more difficult things is taking pictures, pointing the camera through tubes to show what is inside of them. The lens changes just as I am about to take the perfect photo. Any recommendations there would be very helpful. I have tapped the flower icon to disable macro, but it seems like the camera lens will still change and be looking at the floor instead of through the tube. Thank you kindly Ken from Pennsylvania. So for the orientation issue.
1:27:29 - Rosemary Orchard
I did some. I actually have some advice. Oh good, good, I, I figured out I, because I had a similar problem at one point. Okay, I was taking pictures, okay, and I was taking them in and I'll just switch my my camera to the folks can see I was taking them in what I thought was landscape mode.
But folks who are watching the video, who might be very eagle-eyed, will notice if they're looking at the, the camera on my phone the 1x, the 2x, the 5x is 0.5x, they're facing there, they're there, they're perpendicular to to me and if I tip my phone up and then point it back down, oh look, they're at the right orientation. And that is a really good little trick for knowing whether or not your camera is actually pointing in the Right orientation when you're taking the picture. Because I find a lot of folks just sort of like the way that they they turn their phone. Especially if you're doing top-down pictures, it's really easy to not pick your phone up and therefore the accelerometer inside of it doesn't know that you've gone from taking a portrait photo to a landscape photo. So try putting there, like picking your phone up and then and then pointing it down as you change orientations, because I suspect that is Going to be a really big help for just saving you time and fixing all of these later.
1:28:42 - Mikah Sargent
Yes.
So outside of that manual process of you know, actually making sure that the orientation is set, the research that I did suggests that, as as odd as it sounds, that is not currently a feature that the iPhone has.
Where you can say I want the orientation of photographs to be thus, you can set the screen orientation to stay locked in one position, but not your photo Orientation or your camera orientation. The outside of jailbreaking which is something I don't recommend to anyone, that is rather upsetting. As far as the lens changes, this very episode was the perfect episode To learn that, because we talked about the preserve settings feature and also we talked about macro and how to toggle those on and off In the using the settings for the camera app specifically. So, ken, if you're listening and you missed it, head back to earlier in the episode where we talked about those two features and the settings that correspond to them. By Making it so that it doesn't Reset to the default every time you go back into the camera app, you'll have those exactly as you want them and not have to worry about it.
1:30:01 - Rosemary Orchard
Yeah, the only other thing I'll say is, ken, as mentioned specifically, you know They've got photos lined up and they're, you know, they've got their their phone and there's, you know, like a tube or something in front of what the lens is and everything's lined up and then it switches from, say, you know, the lens right in the center to like this bottom lens down here or something like that, and that's because the iPhone's detecting there's something in front of the lens Huh, it looks like maybe it's a finger or something, and it assumes it's blocked and that therefore, it switches to another lens.
So there was, you know, two tricks that you can do with this number one you can use the locking lens option and actually do a video and use an app like frame grabber to grab a frame from the video. But that sounds like it's gonna be quite a lot of work. The other option is, if you're lining up a tube over one of the lenses, just cover the other two so that you know you've only got that one lens that's available, and then the iPhone will pick the best of the lot and if you put your fingers over the other two lenses, it will know that it can't see through those and it will stay on that lens that you're currently using. It's a silly little physical hack, but if that's the sort of thing you're taking pictures of, it's worth knowing.
1:31:04 - Mikah Sargent
Yes, again, it would be great if there were more settings. I guess that could say I only want to use this lens. Don't try to be smart about it.
1:31:15 - Rosemary Orchard
But as we talked about earlier, apple is trying to balance sort of as much control as possible with also a level of intuitive intuitiveness intuition- I believe it's the app first light by the folks who also make double take and film like pro that can actually lock your phone to a Specific camera lens. So for that one in particular, it's worth checking out some options on the app store. Beautiful.
1:31:40 - Mikah Sargent
Alrighty folks, let's take a quick break for a word from our sponsor.
1:31:46 - Speaker 2
Hey there, folks, get ready for the backbeat media podcast network, your new go-to place for top-notch Podcasting fun. You're an Apple fanboy or fan girl? We've got you covered with the cult cast delivering all the i-news you could ever want. More of a literature lover? Bookworm is gonna rock your world. Got a thing for theater. Broadway radio is gonna hit you right in the fields while Matt geek gab and Matt cast are here to feed all your tech cravings. Punk rock your vibe. You're gonna vibe so hard with Jughead's basement.
And for all the dinosaur nerds out there, I know dino is basically your spirit animal, but hold up all about that. Mental health, pop culture and tech life. Christina Warren and Brett Terpster are serving up your weekly dose love. A good flying tail, fig and repeat are about to take your imagination to new heights. And hey to all you small business gurus out there. Dave Hamilton and Shannon Jean are dropping knowledge bombs every week. Backbeat media podcast network, folks, it's where your passions come alive and there's never a dull moment. Hit up backbeat media comm and get ready to binge.
1:32:46 - Mikah Sargent
We are back from our break and that means it's time for app caps. This is the part of the show where we place caps atop our heads or around, over Under, near our heads, to honor our app and or gadget picks of the week the apps or gadgets that we are using Now, or have used for some time perhaps, that we think are great and think you should know about. So, with that in mind, rosemary orchard, tell us about the cap top your head and then tell us about your app or gadget pick of the week.
1:33:31 - Rosemary Orchard
Well, the cap atop my head, it's. It's not so much of a cat, it's a very silly hat. It's got big googly eyes. It's great. It's got a tail. It's got a little fin over here and then it's got two fins over at the back I know the folks can't see both the fins of the back, but I promise they're there and he's got teeth all around my head. I'm a shade of gray and then there's some pink above the teeth. Yep, I'm being eaten by my shark hat. Oh no, this was advertised as a piranha, but it's definitely the wrong color. It's a piranha shark. I don't know what it is.
1:34:03 - Mikah Sargent
It's, it's an app that is a terrifying hybrid. I don't want to meet a piranha shark.
1:34:09 - Rosemary Orchard
I mean, I don't think anybody wants to read me a prayer, but you know that's fine, because piranha is kind of like the app that I am picking as my app, cap today. Now, my app cap today is not actually a piranha, but it is a piranha for those annoying Newsances that pop up on the page of being. Hey, would you like to accept cookies here, except all the cookies? No, I don't want to accept all of your cookies. No, thank you. I would like to select specific ones.
Hush nag blocker will just eat those stupid cookie things for you so that you don't have to deal with them. And it's a free app to download, so you download it. If you open the app, it will tell you either that you are, that everything set up and enabled and you're good to go, or it will show you how to use it. So what I will do a moment is I will just open Safari on my phone, and this is opening a new go page with a shortcut, and then if I tap on the AA in the address bar, then I have various options up here and if I scroll right to the top, I can go to manage extensions. Now in extensions, I have a whole bunch of things here which folks can see.
Yeah, I experiment with these things a lot, but I can see a little yellow icon with two Sort of black eyes and a black mouth that's got the word hush inside of it and that is enabled. So you install the app and you go in and you turn it on, that's it. And then you go to a website that had a cookie notice that was bugging you. It's gone, that's it. It's super simple. It just makes browsing the internet on your phone a lot less painful. So I highly recommend downloading hush nag blocker free from the app store beautiful.
1:35:46 - Mikah Sargent
Alright, I am wearing a large black top hat with a a checkered bow tied around it, and I'm wearing that over the bunny ears that are very real and very much attached to my head. This, I believe, is another Alice in Wonderland hat Worn by the bunny. Who's late? He's late, he's late. I am not late, I am well. Maybe we are running a little late. So I will tell you about my app pick.
This is permission slip made by consumer reports. I have to thank a caller who Joined us on ask the tech guys over the weekend who told us about permission slip. It is an app that you in the United States are able to use for the. It may be available elsewhere, but I know for sure it's available in the United States, again made by consumer reports, and it gives you a way to reach out to companies and request that they either delete your account in some cases, or, if you live in California, which is the state that has a law that says you can tell companies not to sell your personal information, you can also use that opportunity to send them Send their privacy team a letter saying, hey, do not sell my personal information. So if we take a look at the app. Here you have what looks like a sort of Tinder UI. It is that swipeable UI where little cards kind of pop up in your face and then you swipe to the left To get rid of them.
So the first example is Trader Joe's, and here it says learn more and take action. If I tap on this, it pops up what's the company collects? It collects identifiers. It collects online tracking information like your IP, your browsing history and then also communication information. When you scroll down, you'll see the option to submit a request. Here you will see one or two options. If you subscribe to our channel and click the bell icon to get notified of our latest updates, you see just one option. It will be delete my account. If you see two options, that second option is going to be do not sell my personal information. If I had a Trader Joe's account, I do not and I tapped on delete my account. What would happen is consumer reports would send an auto-generated message to the Trader Joe's privacy team, because the companies are required to have a privacy team, and that information would get to them. It would have sort of verification of my identity included in it. I gave my address, my name and my email as well as my phone number to this Consumer Reports app. By the way, consumer Reports holds that they do not collect, they do not sell this information themselves, that it is used only for the purposes of completing these steps and then they send that off. In the case where the company needs to reach out to you to get confirmation, the company will reach out to you to get confirmation, but if it's possible, it will just happen automatically.
So that is the home screen. You can see. I'll scroll through here so you can see some of the. Or swipe through, rather, trader Joe's Hallow, which is a Catholic prayer, sleep and meditation app I shouldn't laugh. Alltrails, which is an app that I've actually talked about in the past that lets you find hiking trails nearby. Instacart, which is a grocery delivery service. Unfortunately, there's only the delete my account option, not do not sell my personal information option, so that's why that's still on there for me.
Amc, theaters, et cetera, et cetera. But if I go into the middle screen here, you can see all of the requests that I've sent McDonald's, udemy, mailchimp, ziprecruiter, the New York Times, yahoo, cvs, health, the Home Depot, lowe's, starbucks, spokyo, petco, vistaprint, king, ticketmaster, at&t, intuit, walmart, netflix, opentable, united and Fandango, and in each of these you will see a different status. So request and progress, for example, or in progress Now, whenever it says in progress, that means that they're still waiting to hear back from the company. Request and progress means that the privacy team probably an automated system reached back out and said we need X information to further complete this. So they will be sending information in return and then the completed section, which is currently empty, will show the ones that have been fully completed when they are done. So in each of these cases I sent a do not sell my personal information request. As a Californian, I'm able to do that, but if there were accounts that you maybe had at one point that you just don't want anymore, you can also whoops send delete my information.
And then the last section are things that can kind of happen automatically. So these are based on the information that you give the app. So it will look at these data broker services and find your emails, your phone numbers, your addresses, your name, and it will go to these data brokers and say, hey, you need to remove this information. And whenever it's done, then they will show up at the completed section. So these are the automatic requests where you don't have to do anything. So all of these are in progress and so between these screens of the home screen that lets you find new companies, requests in auto. I've got all of this underway. And what's great is if you get to the end of the companies and you can always hide them. So if there's some that you're just like, okay, I've done this, I don't need to, I know I don't have an AMC theaters account, you can hide it and that won't show up again.
Then it gives you the option to add new companies, to tell consumer reports what you would like to have added to be able to send the requests. So here you'll see 27 requests have been sent off, which saved me 54 hours of my own work to do. It sent 81 emails. But then also here's the community stats how many they've sent One million community requests, two million hours and three million emails that they've sent out since they started this app. It's available on Android and iOS. You can find it in the App Store Permission Slip by CR, which, of course, is Consumer Reports. Consumer Reports is funded by donations and so they do have an option to send a donation to them. It is a non-profit organization, but yeah, I think this is incredible. It's a great way to, without paying anything, be able to manage your privacy online and kind of tell those data brokers hey, I don't want you to have my information and again available as an app that just has familiar UI and tool in a tool set. So check out Permission Slip in the App Store.
And with that we have reached the end of this episode of iOS Today. If you have feedback, questions concerns shortcuts, corner requests, apps that you think we should be checking out, send those to iOS Today at twittv. That's iOS Today at twittv. We record the show live every Tuesday around about 12 pm Eastern, which is 9 am Pacific. So tune in at twittv slash live to watch the show live, as we record the show live.
But we think the best way to get the show is by subscribing to it or following it, depending on which service you're using, because when you do that, then you get the beautifully edited version as soon as it's available. Head to twittv slash iOS. When you go to that website, you will see links to subscribe to audio or subscribe to video and you can choose which format you want and your podcast provider or player of choice. So we make it very easy and please remember, send a link of the show to your friend, your family member and, again, an enemy you're trying to make amends with. We need more people to subscribe to the show, and a huge shout out to the people who've gotten back to me thus far letting me know that you have asked friends and family members or have gotten friends and family members to truly subscribe. And also a huge shout out to a UK doctor who posted a link to our show on the forums that many a UK doctor use to communicate with one another. That was super cool to hear and I think we're both honored that you did that for us.
This is also the time where I mentioned ClubTWIT, another way to help out and make sure that we can continue to do these shows and bring them to you Twittv slash ClubTWIT. When you join the club, starting at $7 a month or $84 a year, you will get every single Twitch show with no ads. It's just the content. You will also get access to the TwitPlus bonus feed that has extra content you won't find anywhere else Behind the scenes before the show, after the show, special ClubTWIT events get posted there. So when you join, you're going to get access to a back catalog of great stuff, as well as access to the members only Discord server, a fun place to go to chat with your fellow ClubTWIT members and also those of us here at Twit. It's a lot of fun and we regularly have events going on. We're going to have a fun escape room coming up that we'll be doing live in the club, starting again at $7 a month, $84 a year.
It's not a tiered subscription where you get more if you pay more. We just heard from some folks who said you keep adding great stuff. We'd like to pay you more. So you have that option. But whether you pay $7 or you pay $10 or you pay $750, I don't know if it lets you do that you will still get all of the great things, and so please consider joining the club.
On top of all of that, we have some ClubTWIT exclusive shows the Untitled Linux show, a show all about Linux. Hands on Windows, which is a short format show from Paul Thorott that covers Windows tips and tricks. Hands on Mac, which is a short format show from yours truly that covers Apple tips and tricks. Home Theater Geeks from Scott Wilkinson, that has interviews, reviews, questions answered and everything in between related to Home Theater, and also Jason Howell's AI Insider, a show all about AI. All of that is ClubTWIT exclusive. So join the club and check out those great shows. Rose Mary Orchard, if folks want to check you out and see the great work you're doing, where should they go to do so?
1:46:16 - Rosemary Orchard
The best place to go is rosemaryorchardcom, which has got links to podcasts, books, apps and various things I'm involved with all around the internet, and of course, you can also find me on various social media sites which are linked from there, or, of course, in the ClubTWIT live chat discord and, of course, the iOS Today forum there, where folks compose their requests, questions, problems and get answers for myself and all of the other fabulous listeners who are in the ClubTWIT discord. What about you, Micah?
1:46:44 - Mikah Sargent
I can be found at Micah Sargent on many of social media network, or you can head to chiwawacoffeechai h-u-a-h-u-acoffee, where I've got links to the places I'm most active online. Folks, thank you so much for tuning in. Send us the beautiful photos you take with your iPhone after getting all of these tips and tricks, and we will see you next week for another episode of iOS Today. Goodbye.
1:47:08 - Scott Wilkinson
Hey there, Scott Wilkinson here. In case you hadn't heard, Home Theater Geeks is back. Each week I bring you the latest audio video news, tips and tricks to get the most out of your AV system, product reviews and more. You can enjoy Home Theater Geeks only if you're a member of ClubTWIT, which costs $7 a month, or you can subscribe to Home Theater Geeks by itself for only $2.99 a month. I hope you'll join me for a weekly dose of Home Theater Geek-a-Tude.
Transcribed by https://podium.page