Hands-On Photography Episode 122 Transcript
Please be advised this transcript is AI-generated and may not be word for word. Time codes refer to the approximate times in the ad-supported version of the show.
Ant Pruitt (00:00):
Today on Hands-On Photography. We are taking a look at the world of video editing yet. Again, we're going from color correction to color grading. We're gonna take a look at premier pro. We're gonna take a look at Vegas pro. We're gonna take a look at Davin resolve and in particular, we're gonna talk about log video footage. What the heck is that? What the heck is rec seven on the nine? What does it mean to you as a video creator? Y'all stay tuned. This episode of Hands-On Photography is brought to you by no Reba traditional audio conferencing systems can entail lots of components. Installation can take days and you might not get the mic coverage you need. That's complex expensive, but Nova audio is easy to install and manage no technicians required and you get true full room coverage. That's easy, economical, learn more@nova.com.
Ant Pruitt (01:04):
Hey, what's happening everybody. I am at Pruitt. This is Hands-On Photography here on twin TV. Hope y'all are doing well. I am unbelievable as always folks this week, we're going to give back into our video editing video, post processing module, if you will, and just continue that bit of education because yes, photography is not just snapping stills, but it's also snapping a gazillion stills per second for video. So we're gonna continue to talk about that and how we can help you level up your video recording and post processing gain. But before we get into that, allow me to take a few seconds to say hello and welcome to our brand new listeners out there. Welcome to you. Appreciate you hopping in. Do me a favor and subscribe into podcasts after you're enjoying us on we're available on all of them. Of course, because yes, we are TWI that gun.
Ant Pruitt (01:58):
It check us out on Spotify, check us out on apple podcast, check us out on platform, whatever it is. And you can also subscribe to our YouTube channel. Yeah, we are on YouTube. So you can subscribe and watch our content there as well at any rate, subscribe, share, and come back each and every week to see what we're talking about here on Hands-On Photography, or just go to the website too. Twi.Tv/Hop that's twi.tv/h O P for Hands-On Photography. All right, so let's go ahead and get started with this week's episode folks. Okay. So we are going to continue on our path of video post processing. We've talked about just the, the basics of getting into your video editor and walk through, setting up different tracks and audio and all that good stuff and how you can mix in different clips and transitions.
Ant Pruitt (02:54):
And just a little bit of touch up with some of the color correcting process. Well, today we're going to go a little bit deeper regarding the color correcting process, but we're gonna turn that into color grading. Okay. Color grading color grading is not the same as color correction. If you look back color, correction is based making sure your footage looks the way it's supposed to look from a color standpoint. Your white balance has to be in check. The red should looks like, should look like red. The blue should look like blues. So on and so forth. That's getting correct color for your footage. The color grading of it is that's the, our artistic and stylized side of things. And there's a couple ways you can go about doing it, but quite frankly, if your camera is capable of doing so, you want to shoot in a log format because that's gonna offer your offer your footage way more dynamic range, way more flexibility, and post to not only get the correct color setting for your footage, but also really, really push the edge when it comes to grading that footage, that footage to make it look something way more artistic and cinematic, you know, something that's fitting your eyes or something fitting for your client's eyes regarding style.
Ant Pruitt (04:19):
So what I like to recommend is is if you can shoot and log, do it know you're not gonna be able to do so with your latest and greatest iPhone. Yes, they can shoot in pro re, but that's not shooting in log. If you're someone that has headed over to lens rentals.com and rent it, the latest Sony camera are the latest can camera. Those cameras do allow you to shoot and log, and it's gonna be so much useful. And so, so much more helpful when it comes to doing this stuff in post. But what is log, let me break down what log is. And that's L O G when it comes to video footage log is a pretty Daum flat image quality. When you pull it up on the screen, it looks desaturated. It looks like it has no contrast whatsoever. It looks pretty Daum bad, but from a technical standpoint log was, was developed basically looking at how film was developed back in the days, and this allowed the camera manufacturers to be able to get the maximum amount of data and capability out of their image sensors.
Ant Pruitt (05:32):
So you can put it into your projects. Now there's a website that's I believe it's HD video pro.com. They have the full technical breakdown, the nerdy new gritty. I'll put a link to it in the show notes, if you wanna read through that, but I just wanted to simplify it, think of log as it's not raw, but it's pretty similar in the, in the standpoint, far as how you get different leeway to handle the dynamic range and, and really, really push the footage. You know, if I say, I wanna shoot raw with my photos, I get a raw image file from cannon or a raw image file from Sony or whatever, and put it in light room or whatever photo editor of choice. I get so much more flexibility to really CRA that exposure or bring that exposure back just in case I overexpose blog is giving you that same type of capability.
Ant Pruitt (06:24):
It is not raw. It's not raw video, but it's still pretty dagum flexible. It's, it's, it's compressed, but it's really flexible when it comes to a data standpoint. But again, check out HD video pro.com link is in the show notes, and you can read that long dissertation breaking down the differences between raw and log versus what you normally see on your screen, which is rec 7 0 9. Okay. So that's the breakdown. Now what I wanna do next is jump into the different editors. You know, again, we're working with premier pro, we're working with Vegas pro and we're also working with DaVinci resolve all three of those apps. They handle log footage fairly well. They handle it differently, but they handle it fairly well. My favorite of the bunch would probably be the venture resolve because of the extra capabilities with grading built into it.
Ant Pruitt (07:26):
I mean, that's what that app is designed to do, but we'll get to that lastly in this, but let me walk you through checking out premier pro and Vegas pro and then the venture resolve. But before I will wanna do that, I want to take a few minutes and thank the fine folks at Neva. Yes. Complicated and costly. Yeah. It's been the state of audio conferencing for larger spaces for a long time. Y'all choosing a traditional system, might entail difficult design software and selecting for, from a dizzy and array of separate mics and speakers and DSP, and a whole lot of other gear and tech needed just for audio conferencing installation usually requires outside text and is often pretty dagum, invasive and expensive. Let alone, it's costing you a whole lot of money. Your room can be offline for quite a while because they're in there doing this massive installation.
Ant Pruitt (08:27):
The industry has definitely been primed for the same type of leap in tech that has transformed a lot of the different things in the tech industry and simplified it. So the Reva steps in and says, you know, it, we got you covered. So they created the revolutionary microphone, missed technology with this patented tech one or two integrated microphones and speakers. They can fill a room with virtual microphones, thousands of them. So there's no dead songs and everybody that's in the room can be heard and they can hear everybody else coming in through that virtual speaker. It's pretty, Daum cool meeting and class participants can simply talk and move naturally in the space and still be heard by the remote participants. Thanks to the continuous auto calibration. Your rooms are instantly and always ready with optimized audio, no outside text required. Y'all that's, that's good stuff.
Ant Pruitt (09:28):
Neva has simplified installation with its 30 minute DIY process. It doesn't take that long at all. So that means you get big savings on your time and you get big savings on the costs versus the traditional systems that are out there. They've simplified the management for the it department. Yeah. Nevas console gives it the power to monitor and manage and adjust the systems from anywhere. There's no need for it to be running around. Want the chicken with their head cut off from room to room, trying to make sure everybody's conferencing system sounds pretty good. Huh? They can do it remotely. And they're not worrying about a bunch of cables all over the floor and people tripping over 'em and pulling them off the wall. It's so much easier with the new Reva console. So ask yourself if you want to go with the costly and complicated traditional system or make the leap to simple and economical Neva folks learn more@neva.com.
Ant Pruitt (10:30):
That's in you R E a.com. And I appreciate Ava for their support of the show. All right. So let's go ahead and take a look here at the wonderful world of Vegas pro. So I'm gonna switch my screen right here. There we go. So right now I am inside of Vegas pro and I have opened up a a separate here on the screen. This is called my RGB parade and I have two clips here. This is clip one, and this is clip two. And I'm gonna try to show you, you know, as, as quick as I can and efficiently as I can the process here. So right now this piece of footage here was shot on the Sony, a camera, and I shot it in slog three, which is Sony's log format and pulled it in here. And as you're looking at this video, it's pretty flat.
Ant Pruitt (11:28):
You know, it, it sort of looks like there's no contrast and it almost looks like it has a bit of a haze on top of it. You know, like it sort of faded out. That's totally really normal when you're looking at log footage. And what I did now is I took my play head and I parked it on a scene where my, my or my hero is sort of standing out. And it's gonna allow me to get a better judgment on what this piece of footage should look like from a color standpoint. So, first thing I want to do is go down here, like right now that's set to none go down here inside of Vegas, and it's got this input input. Let boy, I think I could talk today. So let me take myself out the screen where you can see what I'm talking about here.
Ant Pruitt (12:13):
There we go right here at the bottom. You have this input let, okay. Well, what is an input? Let an input. Let is short for input, look up table. And I've spoken about lets in the past from the photography side of thing, and it's basically like putting a filter on top of your image. Well, an input LUT is something that's designed specifically for the camera that shot the footage. And Sony has a bunch of different input LUTs. Cannon does black magic does pretty much all of 'em out there, even Panasonic because you know, they shoot in vlog. There's an input LUT out there air for pretty much whatever camera that you're using that specializes in shooting video, not just sending cameras, but it could be some DSLRs that as long as they shoot log. And so that input LUT will be imported into your computer's software.
Ant Pruitt (13:11):
And it's going to basically translate that log foot and help convert it to rec 7 0 9. Okay. If you look up here in my subject, in my file name I wrote on here, ROS rec 7 0 9 question, what is re 7 0 9 in simplest terms rec 7 0 9 is the standard that is seven employ. That allows us to view our images on our HD screens, HD screens and higher rec 7 0 9 recommendation 7 0 9. It deals with the color and luminosity and how things are supposed to look when viewed on an HD screen. That's the simplest way I can explain that. Okay. All right. Now back to Vegas pro. All right. So I'm in Vegas pro and I put, I wanna put a LUT on here input Lu. That is gonna be best suited for the Sony camera. And again, it says S slide three to rec 7 0 9. That is what's designed for the Sony cameras.
Ant Pruitt (14:12):
Now, as I clicked that you should notice just a change to the footage here. There we go. See at first it was a little bit washed out and sort of, you know, hazy looking. Now this actually has some color and this shirt is blue. This gray there, his skin tones came out and it, I mean, it could use a little bit more contrast, but this is, is ready for viewing on an HDTV rec 7 0 9. So now if I want to continue on with post-procesing and color grading color correcting on this, I can. So I'll just hit these little color wheels here and, you know, I could play around with the offset and raise up the exposure and all of that good stuff. And it's really, really easy to do. Now you notice these color wheels on the bottom one says, lift one says, gamma one says gain.
Ant Pruitt (15:08):
Think of these as your lift. The is your shadows. Gamma is your midrange gain is your highlights. And the offset is a bit of a global view and you can adjust all of these different parameters and take a look at your scopes on the screen to really dial in the look that you're trying to get regarding your final image. So I'm gonna push the highlights down just to touch on here. Like, so take the shadows, pull those down. Cause I want to get some black levels in there. Not too much. There we go. And then I wanna take the game and then gamma and pull it up a little more, that mid tone, something like that. And you can just play around with that particular frame to get your color correction started now, next up there, there's more when it comes to using this type of footage and you can really get creative and that's the color grade inside of things.
Ant Pruitt (16:04):
So over here, there's another tab called look, LUT right there. Okay. Look LUT. So we're gonna click on that. And there's a lot of different LUTs in here that you can play with. So I just said it to none, you know, just so we can play around with it, but there's a lot of different LUTs that you can play with. That's gonna give you an additional style house, look for your footage. There's one that I've played with in the past that I enjoyed for pretty much any type of camera I've shot with. And there's this lot that I've downloaded. From a gentleman on YouTube, I am blanking on his name, but I'll put his information in the show notes. I believe his name is Armando, but it's called Mando bites. And I just click on that and it gives you a whole different look for the footage.
Ant Pruitt (16:51):
Notice it sort of made the blues a little, a bit more electric and you have just a slight green tent to the footage. And depending on your scene, it works pretty good. And you can really play around with this strength of this. You know, if I want to dial it all the way back I can, but I look to pull it up and just sort of make it work with this particular scene. So that's playing around with color grading regarding log footage inside of Vegas pro again, you get your input LUT to get your log footage from log to rec 7 0 9, do your color correcting, and then throw it into then throw on a creative LUT or a look LUT to really make it pop. So now I'm gonna minimize that and we're gonna hop on into say premier pro. So let's minimize that.
Ant Pruitt (17:45):
Let's go to premier pro and switch my screen. Here we go. So we have the same footage here or it's two different files. Okay. So again, same footage, same concept. One shot with the Sony. This first piece of footage is actually shot with a, with my black magic camera here. So let's play around with that one. Right. So looking at our scopes here, notice that the, the scopes are all of the data is sort of bunched into the middle. That is a clear indication that this is log footage. It's not really going up and down the the bar, the meters here in your scopes from the RGB parade. So let's go to our input LUTs over here inside the Ry color panel input LUT, I'm shooting with a black magic six K and I have some LUTs that I downloaded called Lehman LUTs right here.
Ant Pruitt (18:45):
And they worked perfectly for the black magic and I had to learn to shoot it in over exposed format. That's why it looks really bright on the screen, but watch when I put this Lud on this input lot, boom, look at that just, Hm. Easy to work with and notice the scopes over here. Everything just is got so much more data that, that it's showing that you have a lot of data that you you can play with. And you have a lot of flexibility. That's just getting into rec 7 0 9. And again, I can continue to dial in the exposure to my liking, you know, I can turn it down, just a touch, play around with the highlights so on and so forth shadows. And that looks pretty good. Okay. Just from the get. Now I wanna get into the creative side of things. And again, there's this tab inside of your Ry color panel for you that are using premier pro.
Ant Pruitt (19:41):
And you can just jump through the different types of creative LUTs that you may have installed. I have a ton of them because I've been playing around with this stuff for years, and there's a lot of free ones out there online. There's a lot of that that you pay for these layman ones I've paid for. And they're really, really cool. This Mondo bites, again from Armando let's click on that and see how that looks. And again, it just sort of changes it up, gives it more of a green overlay, and it really does sort of mess around with the who's here in the scene, even down to the sky, something that you can just sort of stylize, you know, and I can take the intensity and roll it back. Some if I want, so it's not too much and play around with the vibrance and everything else and just really make it work for me.
Ant Pruitt (20:31):
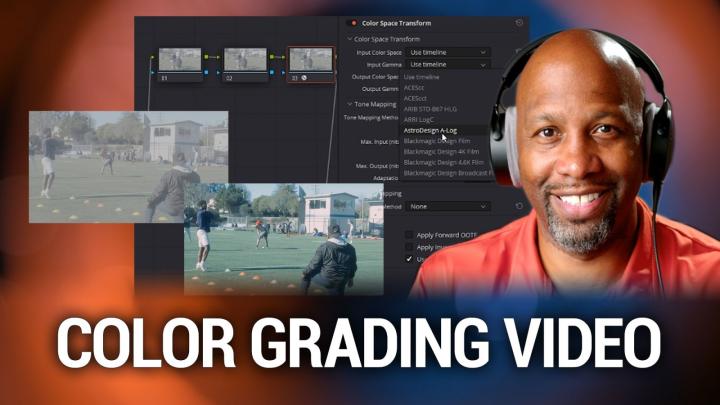
Premier does a really good job sort of making this process very, very simple and putting everything right there in one particular panel. Now I still, I love premier, but man, the venture resolve what they're doing, what color that is, that is something else. So let me quickly hop on over into Davin resolves. So I am inside of resolve again, the same two different files here. This time I'm gonna show you both of them. So let's go back to this one here with him at the football field. I can move my play head there. There we go. All right. So this is him at the football field, and I'm gonna go into the color tab inside of resolve because it really does a good job of breaking things out. And again, I have all of these color wheels and so forth. And remember I shot this particular piece of footage with like magic camera and resolve is going to use a node structure.
Ant Pruitt (21:33):
As you can see over here and this little do Hickey right here on the, on the left of this panel. This is basically your input. This over here is your output. So everything is going to flow from input to it. Okay. That's how you need to think about it. And you can have these nodes and use these nodes as layers while you're working on your color, correcting and color grading process. So what I like to do is I like to add a couple of nodes and it's a couple keyboard shortcuts. You know, you can just shift S well control S and alt S well, no, it's alts, I'm sorry, alt S in here. So I'm gonna add a couple notes. So this is one serial node and you know, I'll just add this one. Yeah, I'll do two, two more. All right. So for this one, I'm going to put basically the input LUT inform so I can get everything to rec 7 0 9.
Ant Pruitt (22:32):
So I'm going to click on this effects tab up here. And I saved a bunch of these different effects. I went ahead and made 'em my favorites. And there's one in here in particular called color space transform. And what does that mean color space transform is taking your cameras information, your log inform and setting it to rec 7 0 9. So I'm just gonna drag that effect onto that node. And you notice you get all of these different parameters. You have the input color space, which I already know is gonna be re rec 7 0 9, your input gamma, which is gonna be my camera, a black magic design pocket, six K, shot it with film. There we go. Film gen gen five like that, and it's already making a change to the scene and then the output color space and scroll it down. It's going to be rec 7 0 9 gamma 2.4.
Ant Pruitt (23:23):
Okay. So it already made a huge difference. Just from adding the rec 7 0 9 colors base to this. Okay. So if I was to turn this off, this is the whoops wrong keystroke. If I was to turn this, this node off, this is the before, and this is after add rec 7 0 9 color space transform. But unfortunately, all this thing is super over exposed. I mean, it it's, this is really, really bright. If I look at my scopes, look at everything, just sort of clipping at the top here. Okay. That's not good. But as I said, previously, I shoot over exposed because I know I'm going to be using the Leming LUTs and the Lemen LUTs that I have. They are perfect for getting everything sort of back into, to balance because sometimes you really need to try to get as much light as you can.
Ant Pruitt (24:18):
So what I'm gonna do is go ahead and just right. Click on this one and say LUTs. And I'm going to look for my Leming LUTs and I gotta bunch of shoes from, so I have this pocket six cage in five film. Boom. Oh, that looks so much better right off the gate. I could probably move this a little more so I can get better focus on my hero shot here. Yeah. That's much better. And now I can really start to play around with the balance in and color correcting and grading. Yes. This is still just a touch overexposed, but I can fix that. So let's just go over here to the offset, go to my very first node offset, pull that back a little bit, get that exposure down. And so it's not clipping, like, so take these highlights, pull 'em down. Some, raise up my shadows just a little bit. There we go.
Ant Pruitt (25:13):
Much better. It's just push and pull, getting everything squared away from a balancing color correction standpoint. All right. If I play through it a little more should look. Okay. Yep. So far so good. But now let's give this a bit of a creative look. So let's add another node here. So when I do alt S to add another node and we can put our creative Lu on here. So we go to LUTs again, go to Mondo bites. Boom. That looks pretty dagum. Cool. But again, inside of resolve, you can play around with this stuff. Even more. You have these color wheels and you can just sort of dial things in if you want to make it more warmer, like, so you can do that. Pull, offset down a little bit, something like that. If you wanna make the shadow more in that blue hue, you can just really play around and have some fun with the, with the color grade inside of things.
Ant Pruitt (26:21):
I'm gonna take that back. And if I want to take a look at the skin, you know, I'll just go to my little vectorscope here, put this over his skin. And hopefully that shows up on the skin line and it does see. So that'll lets me know. Everything is really good with the colors and everything is good with the exposure right out the back. So I'm just gonna put this on this guy's skin. Look, this is a white guy and it still shows up on the same points in my vectorscope. So we are good to go, but again, you can really just play around and get creative with the color. So let's move into this other piece of footage that we had earlier. Same thing, this is Sony. Let's add another node. We'll do color space trans form. Like, so this is shot on the Sony.
Ant Pruitt (27:07):
So we're gonna do slog three like that. And we're gonna take this direct 7 0 9 and the gamma is actually called 2.4. Like that there, turn that off, have some fun with it. Bring up the exposure. Some little push, little pull shadows back. Let's play around with this vibrant of it. Like a dad. It's so pretty. Yes. Doesn't that look great. If I look it on the RGB parade, wave farms look real. They're really good. Nice and balanced looks great. Right. So now let's just add a a creative LUT to it. So we'll save right. Click let, and let's go with Mindo bites again. There we go. Looks great. And if I really want to crank that blue, let's go to the, to the highlights here and just really drag that blue. Like, so let's put a little warmth in the shadows. So we'll go to the lift and drag that more towards the orange side of things, but just ever so slide.
Ant Pruitt (28:31):
Good. Yeah. It's good stuff. So now if I turn everything off, let's see. So this is before and this is after beautiful, right? Yeah. This is a lot of fun. There's so much more inside of DaVinci result. All that we can play with from a color standpoint. And maybe I'll get into that another day, but I've already been talking to Yon for a very long time on this episode. So I'm not gonna take up much more of your time. So yeah, we'll just go ahead and finish this here. Episode up. Hey, thanks for watching this week show. I really do appreciate all of the support. I hope this has been helpful for all of you that are trying to dive into the world of video editing and video post processing. Remember, there's a lot of tools out there. You have the world of Adobe in this creative cloud.
Ant Pruitt (29:24):
I am an Adobe affiliate and I still use it. You have Vegas pro a very, very solid video editor. That's not go and it cost you as much as the Adobe package. And then you have per the venture resolve, which has a free package, but it also has a paid version. I have the paid version of it because there's a few more tools in it that are really, really useful. But yeah, it it's, it's really good. Get the free version of the venture resolve if you want. Just not that it does not support hardware acceleration, so it might be a touch slower if your processor isn't up to snuff. But yeah, it's legit product. So check those out. Adobe premier pro Vegas pro, and DaVinci resolve. If you have any questions, feel free to reach out to me and send an email to hop twit TV, and that's for your questions.
Ant Pruitt (30:15):
That's for your feedback, comments and so forth. I love hearing from you. I've been getting quite few messages regarding the moon photography challenge, and we are going to show, show those different images up really, really soon. So please stay tuned for that. I can't wait to show everybody the images that have been sent. If you catch this before that show, go ahead and send them in now. And if you are cool with me showing your image on the show, make sure you say that in the email and put in the subject line, moving photography. So it's easy for me to find it in my inbox. Okay. All right. Again. Thanks following support. Make sure y'all follow me over on Instagram. I'm not even gonna ask you to follow me on Twitter, follow me on Instagram and underscore Pruit over there. Okay. Let's get that follower number up. I really do appreciate that. And please continue to tell folks about the show and give me a nice rating and comment inside of apple podcast. Even if you don't use apple podcast, I appreciate you going over there and rating and commenting on the show anyway, does mean a lot. Shout out to my man, Mr. Victor for making me look and sound good as he always does, especially when there's fun, edit like this show today and all of the random interruptions that tend to happen here in my studio today. Sorry about that, Mr. Victor,
Ant Pruitt (31:32):
But until next time, folks safely create and dominate. Y'all take care.
Rod Pyle (31:39):
Hey, I'm Rod Pyle editor of ad Astra magazine, and each week I'm joined by Tariq Malik the editor in chief over Space.com in our new This Week in Space podcast. Every Friday Tariq and I take a deep dive into the stories that define the new space age what's NASA up to when will Americans, once again set foot on the moon. And how about those samples from the perseverance Rover? When are those coming home? What the heck is Elon Musk done now? It is addition to all the latest and greatest and space exploration will take an occasional look at bits of space flight history that you probably never heard of and all with an eye towards having a good time along the way. Check us out in your favorite podcaster.