Hands-On Mac 137 transcript
Please be advised this transcript is AI-generated and may not be word for word. Time codes refer to the approximate times in the ad-supported version of the show
0:00:00 - Mikah Sargnt
Coming up on Hands-On Mac, a tool that you can use to make sure that your Mac doesn't fall asleep. Stay tuned, Podcasts you love From people you trust. This is Twit. Welcome back to Hands-On Mac. I am Micah Sargent, and today we are taking a look at amphetamine. And I don't mean the drug, I mean an important application that can help make sure that your Mac stays awake when you need it to. Well, stay awake. Let's head over to the Mac to take a look.
All right, here we are on macOS, and first and foremost, I want to tell you about a tool that you just have built into your system, before we ever talk about amphetamine, which you can purchase independently. That tool is a utility that is built into the terminal. So, in order to access that tool, we're going to hold down the command key and hit the space bar and we're going to type in the word terminal. That will start to bring that up. I will hit return when I find the terminal, and that brings up a terminal window. From there, I will type in the word caffeinate that's C-A-F-F-E-I-N-A-T-E, and when I hit enter or return after typing in caffeinate, what that does is it runs a program in the background that keeps the Mac awake. Caffeinate is just a simple utility that you can use to keep your Mac awake. However, it has been my experience, and the experience of many other people, that caffeinate doesn't always work how you would expect it to. Sometimes it seems like the Mac still finds a way to fall asleep. Sometimes the tool keeps running and you want your Mac to eventually fall asleep. Sometimes it's some mixture of all of those things. That is where a tool like amphetamine comes into play. So I'm going to go ahead and quit this terminal session command Q to quit, and I'm going to terminate the session by clicking to terminate. And what we're going to do is we are going to open up amphetamine. Now amphetamine is already running here in my brow or in my menu bar, but it's also available down here at the bottom. So I'm going to click on amphetamine and I am going to look for it in the menu bar. It's going to look like a circle with a line running through the middle, kind of like a pill. That's sort of the joke there that yes, there's caffeine to keep you awake, but amphetamine is even stronger.
So by default, you have some options when it comes to starting an amphetamine session. You can do a session that runs indefinitely, meaning that there is no defined time at which the session ends. You choose to end it. You can also start a session based on minutes, based on hours, based on a specific amount of time, so for the next hour and 20 minutes, or until 304, 308 pm, whichever time you want while an app is running, which is really great, because then you can say, hey, for the time period in which this app, like Safari, for example, is running and is downloading a file. Please do not turn off amphetamine. I want, while this app is working, for amphetamine to keep the Mac awake. Or you can say, while a file is downloading, so you click on it and it will let you select the kind of partial file that's downloading. It will keep the Mac awake until that file has completed downloading.
You can also, under the while app is running section, choose to show helper apps and processes. When I click to show helper apps and processes, you can start to see some of the stuff that's running in the background. So there could be an app that you know of that has a process that runs in the background that's doing something that you want to make sure your Mac stays awake for Simply deselecting the don't show helper apps or processes allows you to select one of those tools and then from that point, Amphetamine will look for that process happening in the background and wait until that process completes for you to stop the session for amphetamine. Now there are also some quick settings. So quick settings are just kind of different options that will get it more into depth.
But essentially you can say that when I start a session I want to allow the display to sleep. I just don't want the machine to go to sleep. Or I want the system to sleep when the display is closed. So, for example, I could be running amphetamine, but on this Mac, if I were to close the screen, then what I want to have happen is for amphetamine to stop working. I can choose to allow the screensaver after 45 minutes of inactivity, so it will stay on and it'll keep doing its thing, but it will go ahead and trigger the screensaver. And then I can choose to end the session if the battery falls below 10%. So perhaps you have your laptop going but it's not plugged in. This lets you say, hey, once the battery drops to 10% or less, go ahead and let the machine go to sleep.
You can also change system controls options. So lock the screen after one minute of inactivity. So it will still keep the machine on, but if I'm not moving the cursor around, if I'm not doing anything on the machine, then it will lock. Keep the machine on, but if I'm not moving the cursor around, if I'm not doing anything on the machine, then it will lock the screen after one minute. I can also choose to actually make the cursor move after five minutes of an activity. So not only will it keep the Mac awake, but it'll also make the cursor move on the screen as well. And then some other things, which include triggers something called drive alive and then also show the session time remaining in the menu bar. We'll talk about triggers and drive alive, but the session time remaining in the menu bar of course gives you the ability to see a countdown of when the session that you've set to keep the Mac from going to sleep actually ends.
Now you also have the settings menu, and that's kind of the most important thing. Quickly, I could set this for an hour and then amphetamine goes ahead and starts working. There's a little shortcut If I secondary click, also called a right click with the Mac, I can start or stop a session automatically. So right now there's a session that's running. It's keeping the Mac on without falling asleep and I set it for indefinite by default. So right now, with it running, with the pill kind of turned vertically, then it will not allow the Mac to fall asleep. If I turn it to the side by again secondary click or right click with the pill horizontal, then it will be able to go back to sleep.
But let's go into the settings so I can talk a little bit about what's possible. So first and foremost is the general session. Right now I have that secondary click option to quick start a session. So you just simply secondary click on the icon in the menu bar and then of course you've got your standard launch and wake behavior. So when the Mac launches, go ahead, and when you log in rather to the Mac, go ahead and launch Amphetamine. So it's there. If when Amphetamine launches you want it to automatically start a session, you can do that. Or if, when I wake the Mac from sleep, go ahead and start a session, you can also choose to hide or show Amphetamine in the dock. So if you just want the menu bar icon, you don't want the app showing up, then you can do that as well and then reduce motion, which will just kind of reduce some of the animation stuff that's involved.
Session defaults these are what you're going to want to set so that when you do that quick session mode, it will properly set it to your default choices so you can change the duration of the default session from indefinitely to five minutes, 10 minutes, hours or a specific amount of time, how it chooses the end time calculation for what the current value is. So you can have it set to a timer. That's built in. Basically. Think about if you set it to turn off 20 minutes from a specific time. If you use the timer, then it will be 20 minutes, no matter what the system time is. So it could be, you know, 3, 10 and 45 seconds. That doesn't matter, it's just going to use the timer starting at that point. If you use the system time, then it's going to base it on that. So 20 minutes from 310 or whatever time it is. Then force sleep, which says that when the session ends, after you know your period of time, your 10 minutes, 20 minutes is over and the Mac has been kept awake.
I want you to make the Mac go to sleep. After that, you also have display sleep, which allows the display to go to sleep without again allowing the internal hard drive to go to sleep. It's a little bit different whenever we're in SSD or solid state drive territory, but the point is the system is still running, it just turns off the display. Closed display mode allows for the display to be closed and the system to sleep whenever it is closed. So if you have a laptop, that's going to be enabled by default.
And then the screensaver this option allows you to start the screensaver after a certain period of time. I like to have this turned on. I usually have this set to 15 minutes, so I turn allow screensaver after and I set the time to 15 minutes of inactivity. The battery option you can change this from 10%, which is the default, to a specific time and also set a prompt so that even if the battery reaches 10%, if you wanted it to keep the Mac awake, you can have it prompt you first and say hey, you set this. Are you sure you want to have this go to sleep right now? And then, last but not least, is a power adapter. So once again, that is tied to whether or not the power adapter is connected, but that only matters if you have the battery option turned on. So you could say, if the Mac laptop, if the MacBook reaches 10% and I have the power adapter connected, then please don't stop the session.
Next is system control. So these are some more controls over what the system actually does. You can say, for example lock the screen. I want the screen to be locked after I'm not doing anything on the Mac for a minute or five minutes or 10 minutes. Lock the screen after the display is closed. Allow the display to sleep when the screen is locked. So after the screen gets locked, you're you could technically still have the screen on with that login menu there. This will make sure that the display is able to sleep afterward. It also has the built-in cursor movement option so you can move the cursor fast or slow after a certain amount of inactivity and however often you want to every one minute, every three minutes, every five minutes and then you can stop moving the cursor after a certain period of inactivity as well. So maybe you only want that mouse cursor to move every, you know, two minutes after the Mac has been sitting still for 10 minutes. But once you reach 45 minutes of inactivity, don't keep moving the mouse cursor. And then you can also say that hey, if you're switching between accounts, so from one user account to another, please don't keep amphetamine running in the background.
Triggers are pretty cool. These are kind of automations for the Mac and in this case it does pop up some prompts for you. So, for example, you can set triggers for when a Bluetooth device connects. So it is asking me for permission to use Bluetooth. I choose allow. Now I can go through and look at some of the triggers. I'll hit plus and we will see a name for it. So we're just going to call this hands on Mac trigger.
And then you need to set some criteria. It needs to have some level of criteria to evaluate as true for the trigger to activate. So I will choose the plus option and I can say when I connect to a Wi-Fi network, when the IP address is set to this, when the DNS server is set to this, if we're connected to a Cisco VPN, if a specific application does something, we'll talk about that. If there's a specific schedule that I have, we'll talk about that. If there's a specific schedule that I have set up, whether it's battery connected or the power adapter is connected or not connected, if the battery is down to 40%, if certain displays are connected, if there are certain drives that are connected or disconnected, if a USB device is connected or disconnected, if a Bluetooth device is connected or disconnected, if an audio output changes from this to that, if there's this much CPU utilization taking place, if the system has been idle for a specific amount of time. So let's go to application, and then we would choose an application like QuickTime Player and we would choose to add that criteria. Now we can also say that the app needs to be at the front most for this criteria to go into effect. But I'm going to choose QuickTime Player, I'm not going to choose Require App to be at the foremost and I'm going to choose Add Criterion.
So when this application and when, let's see what else do we want to do? When, um, when the twit keyboard, which is a keyboard from work, is connected, then that is a trigger that can activate um, amphetamine. So there's some other options. So you can say that when this trigger is in place, I still want to allow the display to sleep. I want to allow the system to sleep in. The display is closed, I want to allow the screensaver to run after, and I would choose, you know, 10 minutes here and I'll save this. So this trigger is now enabled and it works when QuickTime player is open and this laptop is connected to the Bluetooth keyboard, known as TwitKeyboard. If both of those things aren't true, then it will not turn on amphetamine. So we'll choose save.
Now we'll go to the next one Drive Alive. Drive Alive is a special feature that does require a few more permissions if you choose to enable it. Essentially, what it does is for drives that go to sleep. You can use amphetamine to make sure that those drives stay awake. Very simple. You can, of course, set up hotkeys to start or end a session.
You can have all sorts of different options. So the start or end session option is a toggle, so you could have it set so that when you hold down option control and I don't know A because it's amphetamine then it starts a session if it's not currently going, or it ends a session if it is currently going. You can also have one that just starts a session. You could have one that just ends a session. You can have one that opens or closes a menu option. You can choose to toggle allowing the display to sleep or toggle allowing the screensaver All of those hotkeys are available with an amphetamine. You can also have notifications. I recommend having these on. It just gives you notice that, hey, the session is about to end or hey, you've still got a session going on. It's very helpful to have the session reminders turned on which says every and I like to have this set to 45 minutes every 45 minutes remind me that there's a session running, because I have turned it on to the indefinite amount and then forgot about it. And so my Mac was just running and running and running and running with the screen just left on, and then forgot about it. And so my Mac was just running and running and running and running with the screen just left on, Not great.
And then the last two sections include appearance. You can change the look and feel of amphetamine, including doing an outline option the molecule for amphetamine, a coffee carafe, a tea kettle, an owl, an eyeball, the sun and the moon, an emoji, sleep, so Z or exclamation points, or you can choose a custom image. I like the pill, it works for me, but you have a choice. You can also choose to lower the opacity when it's inactive. I do like to have that turned on, because it just provides a little bit more visual understanding. And then you can also change the padding of either side of the pill so that you have more room or less room on either side, as well as the text. So when you do have it to show the countdown timer, you can choose kind of some adjustments for how it displays. And, last but not least, includes showing the current session details and the Drive Alive details, if you have Drive Alive turned on and installed.
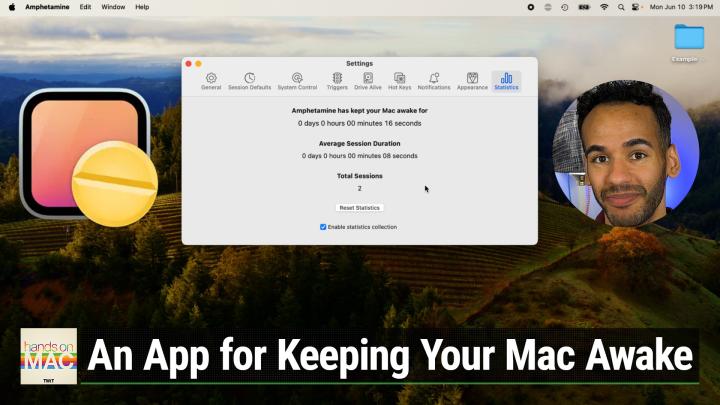
Lastly is the statistics menu. With the statistics menu you are able to see how the app has been saving things on your, or rather how it has been keeping things alive on your um Mac, how long things have been kept awake, uh, or how long the average session is. And of course you can always uh reset those statistics if you want. Amphetamine is available in the Mac app store and it is available for free. You can download the app for free to install it on your Mac and it is a great app. That again, it kind of blows my mind a little bit that the app is available for free for use and it's just caffeinate, but made better.
So if you ever need to keep your Mac awake and running for whatever reason and kind of set up special triggers to do that and also automations to do that. That is what amphetamine can do for you Folks. Thank you so much for tuning into this episode of Hands-On Mac. I, Micah Sargent, will be back next week with another episode. I've received some great questions and responses to the last few episodes and I appreciate you for tuning in and I will catch you again soon for another episode of Hands on Mac. Bye-bye.