Hands On Photography Episode 109 Transcript
Please be advised this transcript is AI-generated and may not be word for word. Time codes refer to the approximate times in the ad-supported version of the show.
Ant Pruitt (00:00):
Today on Hands-On Photography, I have made the promise to get into the video editing. Today is that day. We're gonna get started with editing video, and I'm not gonna make this too hard on you. So just sit back, relax. Let's grab our favorite video editor of choice and let's work on cutting up our first little short clip. Y'all stay tuned.
New Speaker (00:24):
This is TWiT.
Ant Pruitt (00:27):
This episode of Hands-On Photography is brought to you by BetterHelp online therapy. Join over 1 million people who have taken charge of their mental health. As a listener, you'll get 10% off your first month by visiting betterhelp.com/hop.
Ant Pruitt (00:49):
What's going on everybody. I'm Ant Pruitt, and this is Hands-On Photography here on TWiT TV. I hope y'all are doing well, cuz I am unbelievable as always. This year is starting to come to a close and boy, it's been a damn good year. At least I think so. I hope you think so as well. Anyway, with that aside, welcome to the show. If this is your first time catching the show again, welcome to you. Go ahead and consider subscribing. If you're interested in learning more about getting better at photography and getting better at post pro assessing we're available on all of the different podcast applications, you can check us out on Spotify. You can check us out on apple podcast YouTube, or just go to the website, twit.tv/hop that's twit.tv/H O P for Hands-On Photography. And over there, you'll see all of us description options as well as our previous episodes in the show notes and all of the goodness mixed in there.
Ant Pruitt (01:49):
All right. So without any further ado, let's go ahead and get started with this week's episode. Okay. So I promised you several weeks ago that we're gonna start talking about video editing at some point, because yes, video is a part of the photography world, even though it's two different words, but yeah, video is a part of the photography world. And if you have a camera, whether it's a iPhone or Samsung, whatever, or Google pixel or a brand new mirrorless camera or an O DSLR, you have some functionality on those cameras to record video. And I know some of you are curious every now and then. And so you hit that little switch to try to record video, and then there's others of you in that group that are a little bit more ambitious and say, you know, what, how can I record something and string it together to make it look good for, or my social media or create my own little mini film or short film?
Ant Pruitt (02:49):
Well, we're gonna get started today with creating a video project and doing a little bit of post processing on it. Just understanding the basics. This is going to be a really, really rough overview to get you started. And we're gonna build upon this over time. So we'll start a project out, we'll do our little cuts and things and we'll walk through the user interface and so forth. And again, as I've mentioned on the previous episode I use premier pro there are a bunch of other different video editors out there, but when it comes to standards that are used in today's media creation, there's premier pro there's Davin resolve there's final cut pro and there's Vegas there's there's, there's a lot of 'em out there. So you can choose whatever video editor that you'd like to use. I will walk through this stuff inside a premier pro based on fundamental values.
Ant Pruitt (03:49):
Okay? So some things are not gonna be in exact same spot in your video editor, but the functionality should still be there for you. Okay. And at some point I'm gonna dive into DaVinci resolve because it's free, but I'm still learning DaVinci resolve. Okay. So I didn't want to just do a tutorial about video editing and be fumbling and, and bumbling all through the user interface, wasting your time. This is gonna allow us to just sort of speed through this, get you going. So you can start recording your clips and doing a little bit of post processing and editing on your own pretty quickly. All right. So without further ado, let's go ahead and open up. Premier pro this episode of hands on photography is brought to you by better help online therapy, check them out at better help dot slash hop. All right, folks.
Ant Pruitt (04:43):
So the best way to think about therapy is through a bunch of analogies. So I like to do pushups all the time because I'm trying to build up my muscular system and keep myself healthy. We get our cars tuned up to prevent bigger issues down the road. We get annual checkups, you know, like I said, going to the gym and work out for physical fitness and awareness. We do chores. Well, some of us, we do chores to try to avoid the giant mess of a house, you know, that can lead to roaches and other Verin. But anyway, going to therapy is like all of these it's routine maintenance for health and emotional wellness to prevent bigger issues down the road therapy doesn't mean something's wrong with you. It means you're investing in yourself to keep your mind healthy, better help. Isn't just an online therapy.
Ant Pruitt (05:35):
It's customized for you by offering video phone and even live chat sessions with your therapy therapist. So you don't have to see anyone on camera. If you don't want to, it's much more affordable than in person therapy. It definitely is. And you can start communicating with your therapist in under 48 hours. Why invest in everything else and not invest in your own mind. Folks, this podcast is sponsored by better help and hands on photography listeners will get 10% off their first month@betterhelp.com slash hop that's B E T T E R H E L p.com/hop. And I appreciate better help and their support of our show. Okay. So what you see on my screen is the welcome screen for premier pro and we're gonna do a brand new project and then whatever video editor you'd using, there's some function or shortcut that allow you to start a brand new project here in premier.
Ant Pruitt (06:40):
There's a big old button. So I'm just gonna click new project and get rolling with that. And what happens with this is it gives you another dialogue. I'm gonna change where I want my project to be. So I'm gonna put it in this folder called four hop. So we'll just say, call this project. Let's see, not untitled, we'll call it skate pro for hop like that. So that allows me to keep up with it in general, there's a bunch of other settings that you can walk through to start your project. But 95% of the time, the default settings are going to work in whatever application you're using. So I'm not gonna touch any of this right now. We may dive into a little bit more of this stuff on down the road, but right now don't worry about this as a beginner. Okay.
Ant Pruitt (07:33):
So let's go ahead and click okay. On the screen and start our brand new project. Okay. So in our project my interface is set up to be, you know, something that's more comfortable for me, but in the end it's still a lot of the same fundamental values you're going to see in whatever editor that you're using. So if I look up here at the top of premier pro there's a bunch of little tag apps there, one tab that's highlighted in blue says my workspaces. Then the next tab says, libraries, captions, graphics, audio editing. So on. So on and so forth. Okay. And each of these workspace have their own general use, you know? So this one is the editing tab. If I click on that it will give me just a whole different layout for setting up my workspace. And some people like that.
Ant Pruitt (08:28):
I rather work with my own little layout and move things around to, to work best for me. So that's why I have this thing called my workspace that I was able to save, but so need to hear no there, we're still gonna get through this. Okay. So first thing you need to do once you have your project is you need to get your footage that you recorded into the project. And that's basically an import process. So I will head over here this bottom left of my screen, where it says import media to start <laugh>, I'm gonna go ahead and import media so I can right. Click or there's a keyboard shortcut to bring in your different footage. So let's go on over to my folder where the footage is. I put it over here and then it says for hop and there we go.
Ant Pruitt (09:18):
And you can see, I have three different video clips here. So I wanna get all three of those. And like usual, you can just click one time on the first one, hold down, shift, click on the last one. And it will highlight all of the assets that you need and I'm just gonna hit open. And the import process is gonna pop in. All right. Fortunately, I know that these files are labeled and numbered in a decent order. So I know that this is the first one, the second one and third one based on the file numbering system that came when I recorded it. The, that I use at the time, I believe it was the Sony a seven C I can't remember for sure, but it doesn't matter. It's still the same process, whether you are using a knife, an iPhone, or what have you.
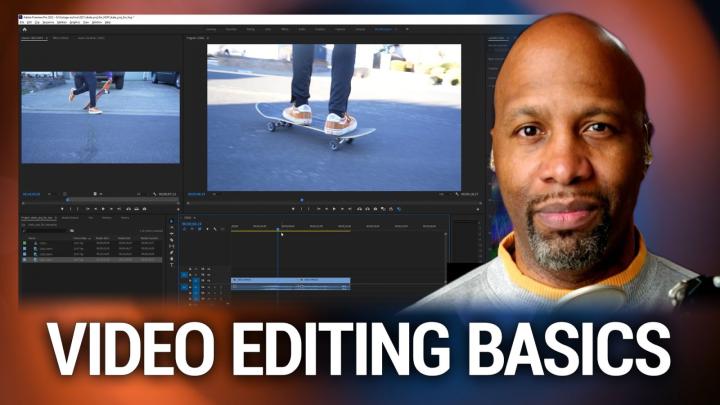
Ant Pruitt (10:07):
So, right. So we got our, our footage here. And if I double click on this first file, it should open up a preview of the image here. Okay. So over here on the left side, this is what's called your source view. Okay. And then over here in the middle, this is what's called the program view. The source view is basically a preview of what you shot. The program view is what's going to be the final out, put that you upload to your social medias or what have you. Okay. So what I like to do is just sort of scrub through the preview and make sure it looks okay and that's normal, you know, and as you can see right there in the beginning, I gotta wobbly shaken and all of this stuff. That's, that's not good. <Laugh>, that's not good at all. So if I just hit play it, WBBs the model comes into the frame.
Ant Pruitt (11:07):
I pan all that good stuff. We're good to go. Okay. So I'm, I'm thinking, all right, this is, this is fine. So I want to go ahead and work with this footage. Next thing to do is to drag this footage into what's called the timeline of your project. Okay? So inside of premier pro or inside of whatever application you use, you have your project file, okay. Which is where you're gonna store all of your data and, and cuts and things of that nature. Then you have your, your actual footage, you have the program menu, which is what, what you're trying to output. And you have the timeline that holds, that holds everything together. Your timeline is where you work your magic, you get all of your footage imported, and then you start to drop it onto your timeline to create your cuts and fades and effects and all of that good stuff.
Ant Pruitt (12:07):
Okay. So now let's hop right back in here. So we are back in premier. So let's go ahead and take this bit of footage that I just scrubbed through, you know, and we're gonna put it onto our timeline. So we're just basically just drag it and drop it right here into the timeline. Okay. So let's take a closer look at our timeline. I believe I can zoom in on this mind to make it bigger. Yep. I can. So my timeline has a bunch of different tracks. Okay. If you look over here on the left hand side, there's a V one V two V three. There's an, a one, a two, a three, the V stands for video, the, a stands for pretty straightforward. Right. But why is it more than one track there? It's more than one track there because you can layer in different videos on top of each other to create whatever artistic vision you're trying to create. Now granted, everything that's on the upper layers are the, is the stuff that's going to be first. So you have to work with your editing skills to make sure whatever's on that upper layer. Doesn't always cover the lower layer, but again, that's stuff that we can get into momentarily, but that's the gist of getting your timeline squared away. All right. So let's go back. And again, I can just play through, I just get a preview of what I already had over there with the audio and the motion and so forth.
Ant Pruitt (13:46):
Okay. So as I said to begin with, I didn't like all of this shaky footage going on right then in the end, in the beginning of it. And quite frankly, I don't really need much of any of this footage. Cuz it's just not really adding a point. I think if I wanted to start on my timeline right about here, I'll be good to go. So what do we need to do? We need to just cut that. We need to trim that down. And this is easy. That's just grabbing the file by the edge here and just dragging it like so, and it's cut down. But if we look at our timeline, now we're at the very beginning of our timeline and it's just the black screen can't have that cuz nobody will wants to just stare to black screen. So the fix to that is to just move it down to the very beginning of your timeline where the time code says zero.
Ant Pruitt (14:46):
Now I'm gonna undo that because there's a couple tricks there. This is also called a ripple delete. And a lot of times you can just right click and say ripple delete or I believe in Davin resolve, it's like hitting back space on your keyboard or probably the same ProfIn and cut as well. But the main point is you just want to get this footage to start at the very beginning of the video file. Not somewhere way down the line where this was looking at to start at four seconds in before we saw anything on the screen. All right. So let's ripple delete that, hit play.
Ant Pruitt (15:29):
All right. I think that's good to go there. So we have another piece of footage over here that we can work with. And also if we look in this bin over here, we, we only brought in three different files, right. But now we have this additional file here. That is our sequence file. Okay. So let's go back to the camera of me. All right. So we got our, we import our footage into a project. Our project has all of the footage that we need and, and the, the, the shots and whatnot, then we need to create a timeline. So we got our timeline there, you put all of your footage into a timeline. That timeline is your sequence. Okay? So you have a project that has a sequence of footage in it. And inside of a project, you can have multiple sequences, but that's far more advanced right now. We're only gonna work with one sequence. So in here we have that sequence file that gets created automatically. When we drag our footage over to a timeline, we worry about more sequence manipulation at a later date. Okay. Now let's get back to premier. Okay. So now let's take a look at this other footage here. I think this one is gonna be very similar to what was in that first frame in that first footage. Gotcha. Yeah, it's the same. So let me see what this one is.
Ant Pruitt (17:07):
All right. That's a different view. Okay.
Ant Pruitt (17:16):
Yeah. This one is a different view where in the first frame I had him walking from the, you know, a different distance. And with this frame, I can pretty much blend these together. So let's go ahead and just drag this bit of footage over to, to the timeline. Actually, no, let's not do that first. Remember we did a trimming and cutting down that extra long footage that was unnecessary for the first clip there, you can do the same thing for your second clip or subsequent clips before you even get them into the timeline by creating what's called in and out points. Okay. So right now I have this preview up and running. And if I play forward, I find the spot that I say, you know what? This is where I want this footage to start from. So I'm gonna drive my cursor to write about here.
Ant Pruitt (18:13):
And then I have these little icons here that says mark in, okay, mark in or keyboard shortcut. I about 95% of the time. So I'm just gonna hit I, and that marks it in. So if you notice on the screen there, the there's a bar that pops up now that shows you, okay, this is where your footage is gonna start playing from. Okay. So if I were to drag Sid footage over to the timeline, like, so, and if I move my cursor, it starts from the end point and it works quite nicely right now. How are we going to get this footage to work together? Because again, I have a gap here don't want that gap. So let's just get rid of that ripple there. So we'll do a ripple delete and we'll play it back and see why, see how it looks.
Ant Pruitt (19:14):
So play it back again. It's walking down, drop stays in the skateboard, skates away, drops it down, stays away. Okay. In my opinion, that doesn't work because of the way it's cut. He's dropping the skateboard down and skating away. And then the next clip comes in. He's dropping the skateboard down and skating away. There's gotta be a better way to blend those together. And it's basically just making a proper cut in the footage to make it all work. So what I'll do is go down here and see a good stopping point. I think right about here would be a good stopping point, something like that. And we can just trim it back. So remember before you basically put your cursor at the edge of your footage and you can just trim it back like that, but now we have a very large gap. There's another tip on here. If you don't want to just do that, ripple that trim back, you can do a bit of a, what is it called? A ripple edit. So here and ear, it says B for the ripple edit tool on my keyboard. I just click right there. And when I drag this back, it's gonna take everything back to that point for me. So I don't have to do a ripple delete anymore. Okay. So now let's play through this and see how it looks.
Ant Pruitt (20:55):
I think that looks so much better that way, right?
Ant Pruitt (21:13):
That looks much better, right? Yeah, I think so. But that's just the initial part of doing video editing. It's, it's getting your, your footage, you know, arrange inside of your project first and foremost, figuring out what footage you want to use, put it into your timeline and start making your cuts. There's a lot of other things that we can do on this. And we'll start working on that in another episode of the show. But right now I'm looking at this and thinking about the audio and I'm thinking about the color, because over here on the right hand side, I got my, my scopes that shows me the wave form of colors and how it's looking. And I could do more color correction stuff, just like what we would do in in photo editing, cuz you got a curves tool and all of that stuff, you know, so I can play with curves and really get creative with this process.
Ant Pruitt (22:06):
But this is all only the beginning folks. And we got a long way to go before we are finished with this particular project. So I hope this is something that you all are really looking forward to because I am. All right. So that is going to do it for this week's episode. Thank you all so much for hanging out with me each and every week. And again, <affirmative> seriously. Thank you. Just, just thank you. 2020 was a weird year. 2021 was not as weird, but quite frankly, I have enjoyed 2021 and I have enjoyed hanging out with you here in the hands off photography community. It, it is just been great. We have continued to learn of different skills to be better photographers and better post processors. The feedback that I've gotten from you all has been tremendous. Seeing some of the images that you all have shared, and there's a couple of you that are, I would say regulars of the hands on photography community that reach out to me or this via email or via social media.
Ant Pruitt (23:09):
And I'm seeing your progress in your photography, just skyrocket it's. It's awesome. I love seeing the progress and I'm so happy that you all are getting better at this craft and also are having fun doing it. So again, thank you for everything that you all have done for the show and for me and my family and continue to share the show out, continue to tell everybody else about hands on for photography and send them on over to the website. Twi.Tv/ hop's TWI do TV slash O P. And if you have any questions, comment, feedback, image, critiques, shoot me an email hop, twi.tv. I love hearing from you and I am more than happy to answer the questions as best I can to help you out. Also from a social media standpoint, feel free to give me a follow, go to instagram.com or just go to I and search for an Pruitt.
Ant Pruitt (24:07):
Just search for Ant Pruitt or Ant underscore Pruitt. Give me a follow there. And if you're in the Twitter verse <laugh> is it okay to say the Twitter verse since metaverse is out there? I don't know anyway, but if you're on Twitter follow me there. I'm T underscore Pruitt. I love hanging out over there and just talking smack with people and having a good time. It's a lot of fun conversations over there on Twitter. All right, everybody. Thank you all so much again for the tremendous support. Thank you to my man, Mr. Victor. Mm, dude, man, I love you. Thank you for all you've done for me this year. And the show really does mean a lot. All right, folks, it's time to close out this year. So safely create and dominate, be safe, peace and love do well. And I see y'all coming up here real soon.
Leo Laporte (24:56):
No ads, just the content. That's what you get. When you join club TWI, you even get extras like TWI plus our new bonus feed just for members. Add exclusive access to the club, TWI discord community. Join now for just $7 a month and support TWI. As we continue to create top-notch podcasts you expect and deserve. I'm just getting started. It'll be one of the first to join. As we build Club TWiT from the ground up, you could be an early member, go to twit.tv/clubtwit to learn more and sign up now. Thanks.